")


Of all the traditions our family cherishes, our annual Halloween baking day is easily one of my favorites. The air gets crisp, the decorations come out, and the kitchen becomes a chaotic, wonderful laboratory of spooky culinary experiments. For years, we tried complex recipes that often ended in more frustration than fun. We’ve had collapsing gingerbread haunted houses and mummy hot dogs that looked more like abstract art. But a few years ago, we stumbled upon a recipe that changed everything: Spooky Brownie Bats Bites. I was skeptical at first, thinking they’d be too fiddly, but I could not have been more wrong. The moment I brought out the ingredients, my kids’ eyes lit up. The process was pure joy. Instead of intricate piping or delicate shaping, we were assembling these adorable little creatures with cookies and candy. My youngest, who usually loses interest after five minutes, was fully engaged, carefully placing the candy eyeballs on each bat, giving them all a unique personality. The best part was the sound of laughter echoing through the kitchen as we held up our finished creations. When we took a platter of these to the neighborhood Halloween potluck, they vanished in minutes. Parents were asking for the recipe, and kids were clamoring for “just one more.” These brownie bats aren’t just a dessert; they are a memory-maker. They are the perfect combination of rich, fudgy chocolate and whimsical, spooky fun. They’ve become our go-to, non-negotiable Halloween treat, and I’m so excited to share this simple, crowd-pleasing, and utterly delicious recipe with you.
Ingredients
This recipe relies on a few simple, easy-to-find components to create a spectacularly spooky treat. The key is in the assembly, so having your ingredients prepped and ready will make the process a breeze.
- 1 box (approx. 18 oz) Fudge Brownie Mix: The foundation of our bats. A fudgy mix works best as it provides a dense, moist base that holds together perfectly when cut and assembled. You’ll also need the ingredients listed on the box, typically water, vegetable oil, and eggs.
- 1/4 cup Chocolate Frosting: This is the magic “glue” that holds our bats together. You can use your favorite store-bought can of chocolate frosting or a simple homemade buttercream. The key is a thick consistency to ensure the wings and eyes stay put.
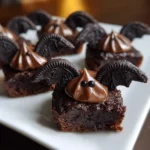
- 24 Miniature Peanut Butter Cups: These form the adorable, round bodies of our bats. They should be unwrapped and, for best results, slightly chilled to make them easier to handle.
- 24 Chocolate Sandwich Cookies: The iconic wings of our bats. Classic Oreo cookies are perfect for this. The contrast between the dark cookie and the cream filling creates a wonderful visual effect when they’re cut in half.
- 48 Small Candy Eyeballs: These bring your spooky creations to life! You can find these in the baking aisle of most grocery stores, especially around Halloween. They add a touch of whimsy and personality to each bat.
Instructions
Follow these step-by-step instructions to assemble your flock of delicious, spooky brownie bats. The process is broken down into baking the base, preparing the components, and the final fun assembly.
Step 1: Bake the Brownies
First, preheat your oven according to the directions on the brownie mix box, typically to 350°F (175°C). Grease and flour a 9×13-inch baking pan, or line it with parchment paper, leaving an overhang on the sides. This overhang will act as a handle, making it much easier to lift the entire brownie slab out of the pan once it’s cooled. Prepare the brownie batter as instructed on the package, mixing the dry mix with the required water, oil, and eggs until just combined. Be careful not to overmix, as this can lead to tough, cakey brownies rather than the fudgy texture we want. Pour the batter into your prepared pan and spread it evenly with a spatula. Bake for the time recommended on the box, or until a wooden toothpick inserted into the center comes out with moist crumbs attached, but not wet batter.
Step 2: Cool and Cut the Brownie Base
This is a crucial step for clean, well-shaped bats. Once the brownies are baked, remove them from the oven and place the pan on a wire rack to cool completely. Do not rush this step! Trying to cut warm brownies will result in a crumbly mess. For best results, let them cool for at least 1-2 hours at room temperature, and then for an extra 30 minutes in the refrigerator. Once fully chilled and firm, use the parchment paper handles to lift the brownie slab out of the pan and place it on a cutting board. Take one of your unwrapped miniature peanut butter cups and use it as a circular guide. Press it gently onto the surface of the brownies to make an indent, or use a small, round cookie cutter (approximately 1.5 inches in diameter) that is the same size as the peanut butter cups. Cut out 24 brownie circles. You can enjoy the leftover brownie scraps as a well-deserved baker’s treat!
Step 3: Prepare the Bat Wings
Now it’s time to create the wings. Take your 24 chocolate sandwich cookies. To separate them, gently twist the two halves apart. You will end up with one half with all the cream filling and one plain cookie half. Set the plain halves aside (they make for great snacking or can be crushed for an ice cream topping). Take the 24 halves that have the cream filling and, using a sharp, non-serrated knife, carefully cut each one in half directly through the middle. This will give you 48 semi-circle “wing” pieces. The cream filling helps hold the cookie together during this process.
Step 4: Assemble Your Spooky Brownie Bats
This is where the magic happens! Set up an assembly line with your brownie circles, peanut butter cups, chocolate frosting, prepared cookie wings, and candy eyeballs. Take one brownie circle. Dab a small amount of chocolate frosting on the bottom of an unwrapped miniature peanut butter cup and press it firmly onto the center of the brownie circle. This secures the “body” of the bat to its base.
Step 5: Attach the Wings and Eyes
Next, take two of your cookie wing halves. Dip the straight, cut edge of each wing into the chocolate frosting. Gently press one wing into each side of the peanut butter cup, positioning them to look like outstretched bat wings. The frosting will act as a strong adhesive. Finally, dab two tiny dots of frosting on the top of the peanut butter cup where you want the eyes to go. Gently press two candy eyeballs onto the frosting dots. Repeat this process for all 24 brownie circles until you have a full flock of spooky, adorable Brownie Bat Bites. Allow them to set for about 15-20 minutes for the frosting to firm up before serving.
Nutrition Facts
These are decadent treats perfect for a special Halloween celebration.
- Servings: 24 Bat Bites
- Calories per serving: Approximately 180 kcal
- Fat: The richness in these bites comes from the chocolate, oil in the brownies, and the peanut butter cups. It’s what makes them so satisfyingly fudgy.
- Carbohydrates: Providing the energy for all your Halloween festivities, the carbs come primarily from the brownie mix and the cookies.
- Sugar: As a sweet dessert, sugar is a key component that makes these bats a delightful treat for your sweet tooth.
Preparation Time
This recipe is fantastic for planning ahead, with most of the time being hands-off.
- Active Preparation Time: 30 minutes (This includes mixing the batter and the final assembly of the bats).
- Baking Time: 25-30 minutes.
- Cooling Time: 1.5 – 2 hours (This is essential for getting clean cuts, so don’t skip it!)
- Total Time: Approximately 2.5 – 3 hours.
How to Serve
Presentation can elevate these simple treats into a stunning Halloween centerpiece. Here are a few creative ways to serve your Spooky Brownie Bat Bites:
- Create a Spooky Graveyard Platter:
- Use a large, dark-colored or black platter as your base.
- Crumble the leftover plain chocolate sandwich cookies or brownie scraps to create “dirt.”
- Arrange the Brownie Bat Bites as if they are flying over the “dirt.”
- For an extra spooky touch, place a few gummy worms wriggling out of the dirt.
- On a Multi-Tiered Stand:
- Display the bat bites on a two or three-tiered dessert stand.
- Alternate them with other Halloween-colored treats like orange macarons, white chocolate-covered pretzels, or small bowls of candy corn. This creates an impressive visual display for a party.
- As Individual Party Favors:
- Place each brownie bat in a festive Halloween-themed cupcake liner.
- Carefully slide each one into a small, clear cellophane bag.
- Tie the bags with orange and black curling ribbon for a perfect, edible party favor for guests to take home.
- Part of a “Build-Your-Own-Monster” Bar:
- For a fun, interactive kids’ party idea, pre-bake and cut the brownie circles.
- Set out bowls with all the components: peanut butter cups, cookie wings, frosting, and candy eyeballs.
- Also include other fun decorations like sprinkles, mini chocolate chips, or red gel icing, and let the kids assemble their own spooky creations.
- Paired with a Themed Drink:
- Serve the brownie bats alongside a glass of cold milk, which perfectly complements the rich chocolate flavor.
- For a party, pair them with a “Witches’ Brew” green punch or a warm, spiced apple cider for a cozy autumn feel.
Additional Tips
Here are eight tips to ensure your brownie bat-making experience is a soaring success and to help you customize the recipe to your needs.
- The Chill is Key for Cutting: For ultra-clean, professional-looking brownie circles, go one step further with chilling. After the brownies have cooled completely at room temperature, cover the pan with plastic wrap and place it in the freezer for 30-45 minutes. The firm, frozen slab will be much easier to cut without crumbling.
- Go Completely Nut-Free: If you’re dealing with nut allergies, you can easily adapt this recipe. Instead of miniature peanut butter cups, use ROLO candies (caramel-filled chocolates) or chocolate-covered caramels for the body. This provides the same shape and adhesion while keeping the treat safe for everyone.
- Make-Ahead Magic for Busy Hosts: You can prepare all the components a day in advance. Bake and cut the brownie circles and store them in an airtight container. Cut the cookie wings and store them separately in another airtight container. Unwrap the peanut butter cups. On the day of the party, all you have to do is the fun assembly part, which takes less than 20 minutes.
- Wing Integrity 101: The chocolate sandwich cookie “wings” can be fragile. To minimize breakage when separating them, avoid twisting too hard. A gentle, steady twist is best. When cutting them in half, use a thin, sharp knife and press down firmly and decisively. If a few break, don’t worry—they become part of the “dirt” for your graveyard platter!
- Get the Kids Involved: This recipe is perfect for little helpers. Assign age-appropriate tasks: younger kids can be in charge of placing the candy eyeballs, while older kids can help cut the brownie circles (with supervision) and attach the wings. It makes the process a fun family activity.
- Frosting as a Flavor Boost: Don’t be afraid to experiment with the frosting! While chocolate is classic, using a cream cheese frosting can add a tangy contrast to the rich brownie. You could even tint a vanilla or cream cheese frosting with orange or green food coloring for an extra pop of Halloween color.
- Brownies from Scratch: If you’re not a fan of boxed mixes, feel free to use your favorite from-scratch fudgy brownie recipe. Just make sure it’s a recipe that yields a dense, non-cakey brownie that can hold its shape. Bake it in the same 9×13-inch pan for the best results.
- Proper Storage for Freshness: To store the finished Brownie Bat Bites, place them in a single layer in a long, shallow airtight container. If you need to stack them, place a sheet of parchment paper between the layers to prevent them from sticking together. They will stay fresh at room temperature for up to 3 days. The cookie wings may soften slightly over time, so they are best enjoyed within the first 48 hours.
FAQ Section
Here are answers to some frequently asked questions about making these Spooky Brownie Bat Bites.
1. Can I make the brownies from scratch instead of using a boxed mix?
Absolutely! A from-scratch recipe works wonderfully. The most important thing is to choose a recipe specifically for “fudgy” brownies, not “cakey” ones. Fudgy brownies have a higher fat-to-flour ratio, making them denser and moister, which is ideal for cutting and holding the weight of the toppings without crumbling. Bake your favorite recipe in a 9×13-inch pan and follow the cooling and cutting instructions as written.
2. My chocolate sandwich cookie wings keep breaking when I try to cut them. What am I doing wrong?
This is a common issue! The key is to use a sharp, straight-edged knife (not serrated). Place the cream-filled cookie half on a cutting board and press down firmly and quickly in one motion. A slow sawing motion is more likely to cause it to crumble. If they are still breaking, try zapping a few cookies in the microwave for 5-7 seconds. This can soften the cream and cookie just enough to make them easier to cut without shattering.
3. I can’t find candy eyeballs anywhere. What are some good alternatives?
No problem! You can easily make your own eyes. Use a tube of white decorating icing to make two small dots, then use a tube of black decorating gel or a mini chocolate chip for the pupil. Another simple option is to use the pointy end of a toothpick to dot on a tiny bit of the chocolate frosting and then stick on white nonpareils or small round sprinkles.
4. How far in advance can I make these for a Halloween party?
These are great for making ahead. You can bake, cool, and cut the brownie bases up to 2 days in advance and store them in an airtight container at room temperature. The cookie wings can also be prepared and stored separately. For maximum freshness and crunchiness of the wings, it’s best to assemble the bats on the day of the party. However, if you’re short on time, you can fully assemble them up to 24 hours in advance and store them in an airtight container.
5. Are these treats suitable for a classroom or school party?
They can be, but you must be mindful of allergies. The classic recipe uses peanut butter cups. If you are taking them to a school or any event where you are unsure about nut allergies, it is crucial to use the nut-free alternative mentioned in the tips section (like ROLO candies or chocolate-covered caramels). Always label your treats as “contains dairy and wheat” and specify if you have made them nut-free.
6. My frosting isn’t holding the wings on properly. How can I fix this?
This usually happens if the frosting is too thin or soft. If you’re using canned frosting, try stirring it vigorously and even chilling it in the refrigerator for 15-20 minutes to help it firm up. If you’ve made homemade frosting and it’s too loose, you can thicken it by beating in a little more powdered sugar until it reaches a stiffer, glue-like consistency.
7. Can I freeze the fully assembled Brownie Bat Bites?
It’s generally not recommended to freeze the fully assembled bats. The cookie wings will absorb moisture during the thawing process and become very soft and soggy. However, you can absolutely freeze the undecorated brownie circles. Place them in a single layer on a baking sheet to flash-freeze, then transfer them to a freezer-safe bag or container. They will keep for up to 3 months. When you’re ready to use them, just thaw them at room temperature before assembling.
8. How can I make these brownie bats look even spookier or more detailed?
Get creative! For a vampiric touch, use a tube of red decorating gel to draw tiny fangs coming down from the peanut butter cup “mouth.” You could also use a toothpick to create little indentations on the cookie wings to mimic the texture of real bat wings. Another fun idea is to dust them lightly with edible black or purple glitter dust for a magical, shimmery effect under party lights.
Spooky Brownie Bats Bites
Ingredients
This recipe relies on a few simple, easy-to-find components to create a spectacularly spooky treat. The key is in the assembly, so having your ingredients prepped and ready will make the process a breeze.
- 1 box (approx. 18 oz) Fudge Brownie Mix: The foundation of our bats. A fudgy mix works best as it provides a dense, moist base that holds together perfectly when cut and assembled. You’ll also need the ingredients listed on the box, typically water, vegetable oil, and eggs.
- 1/4 cup Chocolate Frosting: This is the magic “glue” that holds our bats together. You can use your favorite store-bought can of chocolate frosting or a simple homemade buttercream. The key is a thick consistency to ensure the wings and eyes stay put.
- 24 Miniature Peanut Butter Cups: These form the adorable, round bodies of our bats. They should be unwrapped and, for best results, slightly chilled to make them easier to handle.
- 24 Chocolate Sandwich Cookies: The iconic wings of our bats. Classic Oreo cookies are perfect for this. The contrast between the dark cookie and the cream filling creates a wonderful visual effect when they’re cut in half.
- 48 Small Candy Eyeballs: These bring your spooky creations to life! You can find these in the baking aisle of most grocery stores, especially around Halloween. They add a touch of whimsy and personality to each bat.
Instructions
Follow these step-by-step instructions to assemble your flock of delicious, spooky brownie bats. The process is broken down into baking the base, preparing the components, and the final fun assembly.
Step 1: Bake the Brownies
First, preheat your oven according to the directions on the brownie mix box, typically to 350°F (175°C). Grease and flour a 9×13-inch baking pan, or line it with parchment paper, leaving an overhang on the sides. This overhang will act as a handle, making it much easier to lift the entire brownie slab out of the pan once it’s cooled. Prepare the brownie batter as instructed on the package, mixing the dry mix with the required water, oil, and eggs until just combined. Be careful not to overmix, as this can lead to tough, cakey brownies rather than the fudgy texture we want. Pour the batter into your prepared pan and spread it evenly with a spatula. Bake for the time recommended on the box, or until a wooden toothpick inserted into the center comes out with moist crumbs attached, but not wet batter.
Step 2: Cool and Cut the Brownie Base
This is a crucial step for clean, well-shaped bats. Once the brownies are baked, remove them from the oven and place the pan on a wire rack to cool completely. Do not rush this step! Trying to cut warm brownies will result in a crumbly mess. For best results, let them cool for at least 1-2 hours at room temperature, and then for an extra 30 minutes in the refrigerator. Once fully chilled and firm, use the parchment paper handles to lift the brownie slab out of the pan and place it on a cutting board. Take one of your unwrapped miniature peanut butter cups and use it as a circular guide. Press it gently onto the surface of the brownies to make an indent, or use a small, round cookie cutter (approximately 1.5 inches in diameter) that is the same size as the peanut butter cups. Cut out 24 brownie circles. You can enjoy the leftover brownie scraps as a well-deserved baker’s treat!
Step 3: Prepare the Bat Wings
Now it’s time to create the wings. Take your 24 chocolate sandwich cookies. To separate them, gently twist the two halves apart. You will end up with one half with all the cream filling and one plain cookie half. Set the plain halves aside (they make for great snacking or can be crushed for an ice cream topping). Take the 24 halves that have the cream filling and, using a sharp, non-serrated knife, carefully cut each one in half directly through the middle. This will give you 48 semi-circle “wing” pieces. The cream filling helps hold the cookie together during this process.
Step 4: Assemble Your Spooky Brownie Bats
This is where the magic happens! Set up an assembly line with your brownie circles, peanut butter cups, chocolate frosting, prepared cookie wings, and candy eyeballs. Take one brownie circle. Dab a small amount of chocolate frosting on the bottom of an unwrapped miniature peanut butter cup and press it firmly onto the center of the brownie circle. This secures the “body” of the bat to its base.
Step 5: Attach the Wings and Eyes
Next, take two of your cookie wing halves. Dip the straight, cut edge of each wing into the chocolate frosting. Gently press one wing into each side of the peanut butter cup, positioning them to look like outstretched bat wings. The frosting will act as a strong adhesive. Finally, dab two tiny dots of frosting on the top of the peanut butter cup where you want the eyes to go. Gently press two candy eyeballs onto the frosting dots. Repeat this process for all 24 brownie circles until you have a full flock of spooky, adorable Brownie Bat Bites. Allow them to set for about 15-20 minutes for the frosting to firm up before serving.
Nutrition
- Serving Size: one normal portion
- Calories: 180


