")


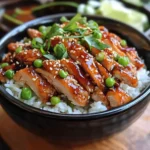
In our busy household, weeknight dinners need to be three things: quick, easy, and absolutely delicious. For years, finding a recipe that ticks all these boxes felt like searching for a culinary unicorn. Then, we stumbled upon Sticky Chicken Rice Bowls, and let me tell you, it was a game changer. From the first bite, my family was hooked. The sweet and savory sticky glaze on the tender chicken, paired with fluffy rice and vibrant veggies, is simply irresistible. Even my pickiest eater devours every last grain of rice. This recipe has become a regular in our rotation, not just because it’s incredibly flavorful, but also because it’s so versatile and adaptable to whatever we have on hand. Whether you’re a seasoned cook or just starting out, these Sticky Chicken Rice Bowls are guaranteed to become a new family favorite in your home too.
Ingredients
- Boneless, Skinless Chicken Thighs: (1.5 lbs) The star of the dish, chicken thighs are used for their tenderness and flavor, but breasts can be substituted if preferred.
- Cooked Rice: (3 cups) Provides the base of the bowl. Jasmine, basmati, or brown rice all work well.
- Soy Sauce: (1/2 cup) Forms the savory foundation of the sticky glaze, adding umami and depth of flavor.
- Honey: (1/4 cup) Sweetens the glaze and contributes to its sticky texture, balancing the saltiness of the soy sauce.
- Rice Vinegar: (2 tablespoons) Adds a tangy counterpoint to the sweetness and saltiness, brightening the overall flavor profile.
- Fresh Ginger: (1 tablespoon, grated) Infuses the glaze with a warm, zesty aroma and flavor, crucial for an authentic Asian-inspired taste.
- Garlic: (2 cloves, minced) Provides a pungent and savory base note to the glaze, complementing the ginger.
- Sesame Oil: (1 tablespoon) Adds a nutty aroma and flavor, enhancing the Asian-inspired character of the dish.
- Cornstarch: (1 tablespoon) Thickens the glaze to create its signature sticky consistency.
- Water: (1/4 cup) Helps to balance the glaze and ensures it coats the chicken evenly.
- Broccoli Florets: (1 head, cut into bite-sized pieces) Adds a healthy and vibrant green element to the bowl, offering a slightly bitter counterpoint.
- Carrots: (2 medium, sliced or shredded) Provides sweetness, color, and a satisfying crunch to the bowls.
- Green Onions: (2-3, thinly sliced) Used as a fresh garnish, adding a mild oniony flavor and visual appeal.
- Sesame Seeds: (For garnish) Adds a nutty flavor and visual texture to the finished bowls.
- Optional Toppings: (Sriracha, chopped peanuts, cilantro, etc.) Allows for customization and adds extra layers of flavor and texture.
Instructions
- Prepare the Chicken: Begin by cutting the boneless, skinless chicken thighs into bite-sized pieces, about 1-inch cubes. This will ensure the chicken cooks quickly and evenly, and that each piece is well-coated in the delicious sticky glaze. Set aside.
- Whisk Together the Glaze: In a medium-sized bowl, whisk together the soy sauce, honey, rice vinegar, grated fresh ginger, minced garlic, sesame oil, cornstarch, and water. Ensure that the cornstarch is fully dissolved to prevent any lumps in your glaze. This mixture is the heart of the dish, providing that irresistible sweet, savory, and sticky coating for the chicken. Taste and adjust seasonings if needed – you might want a touch more honey for sweetness or soy sauce for saltiness, depending on your preference.
- Cook the Chicken: Heat a large skillet or wok over medium-high heat. Add a tablespoon of cooking oil (vegetable, canola, or coconut oil works well). Once the oil is hot, add the cubed chicken to the skillet in a single layer, being careful not to overcrowd the pan. If necessary, cook the chicken in batches to ensure proper browning. Sear the chicken on all sides until it is nicely browned and cooked through. This step is crucial for developing flavor and ensuring the chicken is tender and juicy. Avoid overcooking, as this can make the chicken dry.
- Add the Glaze and Simmer: Once the chicken is cooked through, reduce the heat to medium-low and pour the prepared glaze over the chicken in the skillet. Stir to ensure that all pieces of chicken are evenly coated with the glaze. Let the mixture simmer for about 5-7 minutes, or until the glaze has thickened and become sticky, clinging beautifully to the chicken. Stir occasionally to prevent sticking and ensure even cooking. As the glaze simmers, it will reduce and intensify in flavor, creating that signature stickiness.
- Steam or Sauté the Vegetables: While the chicken is simmering in the glaze, prepare your vegetables. You can steam the broccoli florets until they are tender-crisp and lightly bright green. Alternatively, you can sauté them in a separate pan with a little oil and a pinch of salt until they are slightly softened and lightly browned. For the carrots, you can either add them to the skillet with the broccoli during the last few minutes of steaming/sautéing to soften slightly, or keep them raw for a satisfying crunch in the bowls. If you prefer softer carrots, you can sauté or steam them for a few minutes.
- Assemble the Rice Bowls: Now it’s time to assemble your Sticky Chicken Rice Bowls. Divide the cooked rice evenly among bowls. Spoon a generous portion of the sticky glazed chicken over the rice. Arrange the cooked broccoli florets and sliced or shredded carrots around the chicken.
- Garnish and Serve: Garnish each bowl with thinly sliced green onions and sesame seeds. For an extra kick, offer optional toppings like sriracha for heat, chopped peanuts for crunch, or fresh cilantro for a fresh herbal note. Serve immediately and enjoy the delightful combination of flavors and textures in your homemade Sticky Chicken Rice Bowls!
Nutrition Facts
(Per Serving, approximate)
- Servings: 4
- Calories: 550 kcal
- Protein: 40g
Note: Nutritional values are estimates and can vary based on specific ingredients and portion sizes.
Preparation Time
Prep Time: 20 minutes
Cook Time: 25 minutes
Total Time: 45 minutes
This recipe is wonderfully efficient for a weeknight meal. The active cooking time is relatively short, and much of the preparation can be done while the chicken is marinating or cooking. The quick cooking time and straightforward steps make it a perfect choice for busy individuals and families looking for a healthy and flavorful dinner without spending hours in the kitchen.
How to Serve
Sticky Chicken Rice Bowls are incredibly versatile and can be served in a variety of ways. Here are some ideas to elevate your meal:
- Classic Bowl Style:
- Serve in individual bowls with a base of fluffy white rice.
- Arrange the sticky chicken prominently in the center.
- Place steamed or sautéed broccoli and carrots artfully around the chicken.
- Garnish with green onions and sesame seeds for a visually appealing presentation.
- Family-Style Platter:
- Serve the sticky chicken, rice, and vegetables separately on platters.
- Allow everyone to build their own bowls, customizing their portions and toppings.
- This is great for gatherings and allows for easy seconds.
- With Different Rice Varieties:
- Experiment with brown rice for a nuttier flavor and added fiber.
- Try quinoa for a protein-packed and gluten-free alternative.
- Use sticky rice (glutinous rice) for an even stickier and chewier texture that complements the glaze.
- Add More Vegetables:
- Incorporate other stir-fried vegetables like bell peppers (red, yellow, or orange), snap peas, edamame, or bok choy for added nutrients and textures.
- Consider adding a side of kimchi or pickled vegetables for a tangy and spicy element.
- Spice it Up:
- Serve with a side of sriracha, chili garlic sauce, or gochujang for those who like extra heat.
- Add a pinch of red pepper flakes to the glaze for a subtle kick.
- Cooling Accompaniments:
- Pair with a refreshing cucumber salad or a light coleslaw to balance the richness of the sticky chicken.
- Offer a side of edamame pods sprinkled with sea salt for a healthy appetizer.
- Garnish Variety:
- Offer a selection of garnishes such as chopped peanuts or cashews for crunch.
- Fresh cilantro or basil for herbaceous notes.
- Lime wedges for a squeeze of acidity.
- Make it a Lettuce Wrap:
- For a lighter, low-carb option, serve the sticky chicken and vegetables in crisp lettuce cups (like butter lettuce or romaine lettuce) instead of rice bowls.
Additional Tips for Perfect Sticky Chicken Rice Bowls
- Marinate for Deeper Flavor: For even more flavorful chicken, marinate the cubed chicken in a portion of the glaze (about 1/4 cup) for at least 30 minutes, or up to a few hours in the refrigerator. This allows the flavors to penetrate the chicken, resulting in a more robust and delicious dish.
- Don’t Overcrowd the Pan: When searing the chicken, make sure not to overcrowd the skillet. Overcrowding will steam the chicken instead of searing it, preventing it from browning properly and developing a flavorful crust. Cook in batches if necessary to ensure each piece of chicken browns nicely.
- Adjust Sweetness and Saltiness to Taste: The balance of sweet and savory in the glaze is key. Taste the glaze before adding it to the chicken and adjust the honey and soy sauce levels to your preference. Some may prefer a sweeter glaze, while others might like it more savory.
- Use Fresh Ginger and Garlic: Fresh ginger and garlic are essential for the authentic flavor of this dish. Avoid using powdered versions if possible, as fresh ingredients provide a much brighter and more vibrant flavor. Grate or mince them finely to release their maximum flavor into the glaze.
- Control the Stickiness: If you prefer a less sticky glaze, you can reduce the amount of honey slightly. Conversely, for a stickier glaze, you can add a bit more honey or simmer the glaze for a longer time to reduce it further.
- Customize Your Vegetables: Feel free to swap out or add other vegetables based on your preferences and what you have on hand. Bell peppers, snow peas, snap peas, mushrooms, or baby corn would all be delicious additions to your Sticky Chicken Rice Bowls.
- Make it Ahead of Time: The sticky chicken can be made ahead of time and stored in the refrigerator for up to 3 days. Reheat it gently in a skillet or microwave before serving. The flavors often meld together even more beautifully overnight. Cook the rice fresh for the best texture, but it can also be made ahead and reheated.
- Double the Batch for Meal Prep: This recipe is perfect for meal prepping. Double or triple the batch of sticky chicken and rice to enjoy throughout the week for lunches or quick dinners. Store the chicken and rice separately in airtight containers in the refrigerator and assemble the bowls just before serving.
Frequently Asked Questions (FAQ)
Q1: Can I use chicken breasts instead of chicken thighs?
A: Yes, you can definitely use chicken breasts. Chicken thighs are preferred for their richer flavor and tenderness, as they are more forgiving if slightly overcooked. However, boneless, skinless chicken breasts will work perfectly well. Just be mindful not to overcook them, as they can become dry. Cut them into similar bite-sized pieces as you would the thighs, and follow the recipe as instructed.
Q2: Can I make this recipe gluten-free?
A: Yes, you can easily make Sticky Chicken Rice Bowls gluten-free. The key ingredient to substitute is the soy sauce. Use tamari, which is a type of soy sauce that is typically gluten-free (always double-check the label to ensure it is certified gluten-free). All other ingredients in the recipe are naturally gluten-free. Serve with rice or quinoa to maintain a gluten-free meal.
Q3: How can I make this recipe spicier?
A: There are several ways to add spice to your Sticky Chicken Rice Bowls. You can add a pinch of red pepper flakes to the glaze while it’s simmering. Alternatively, you can serve the bowls with a side of sriracha, chili garlic sauce, gochujang, or your favorite hot sauce, allowing individuals to customize the level of spice to their liking. You can also finely chop a fresh chili pepper (like jalapeño or bird’s eye chili) and add it to the glaze while cooking for a more integrated heat.
Q4: What kind of rice is best for rice bowls?
A: The best type of rice for rice bowls is really a matter of personal preference. Jasmine rice is a popular choice due to its fragrant aroma and slightly sticky texture, which complements the sticky chicken beautifully. Basmati rice is another great option, known for its long grains and fluffy texture. For a healthier option, brown rice provides a nuttier flavor and added fiber. You can also experiment with other types of rice like sushi rice or even quinoa for a protein-rich alternative.
Q5: Can I add more vegetables to these rice bowls?
A: Absolutely! Sticky Chicken Rice Bowls are incredibly versatile, and you can add a wide variety of vegetables to make them even more nutritious and flavorful. Bell peppers (any color), snap peas, snow peas, mushrooms, baby corn, bok choy, spinach (added at the end to wilt), and even roasted vegetables like sweet potatoes or butternut squash would all be delicious additions. Feel free to get creative and use whatever vegetables you enjoy or have on hand.
Q6: How long will leftovers last in the refrigerator?
A: Leftover Sticky Chicken Rice Bowls, when stored properly in airtight containers in the refrigerator, will last for up to 3-4 days. It’s best to store the chicken and rice separately if possible to maintain the texture of the rice. Reheat the chicken and rice separately in the microwave or skillet until heated through before assembling your bowls. Ensure the chicken is heated to an internal temperature of 165°F (74°C) before consuming.
Q7: Can I freeze sticky chicken for later?
A: Yes, you can freeze the sticky chicken for future meals. Allow the cooked chicken and glaze to cool completely, then transfer it to an airtight freezer-safe container or freezer bag. Freeze for up to 2-3 months. When ready to use, thaw the chicken overnight in the refrigerator or use the defrost setting on your microwave. Reheat thoroughly in a skillet or microwave until heated through. The texture of the glaze might change slightly after freezing and thawing, but the flavor should remain delicious. Rice is generally not recommended for freezing as it can become dry and grainy upon thawing.
Q8: Can I make this recipe vegetarian or vegan?
A: While this recipe is centered around chicken, you can adapt it to be vegetarian or vegan. For a vegetarian option, you could substitute the chicken with firm tofu or tempeh, pressed and cubed, then pan-fried or baked until golden brown before adding the glaze. For a vegan version, ensure you use maple syrup or agave nectar instead of honey in the glaze. You can also use plant-based chicken substitutes or simply focus on a bowl with rice and a variety of vegetables and the delicious sticky glaze. Consider adding edamame or roasted chickpeas for added protein.
Sticky Chicken Rice Bowls
Ingredients
- Boneless, Skinless Chicken Thighs: (1.5 lbs) The star of the dish, chicken thighs are used for their tenderness and flavor, but breasts can be substituted if preferred.
- Cooked Rice: (3 cups) Provides the base of the bowl. Jasmine, basmati, or brown rice all work well.
- Soy Sauce: (1/2 cup) Forms the savory foundation of the sticky glaze, adding umami and depth of flavor.
- Honey: (1/4 cup) Sweetens the glaze and contributes to its sticky texture, balancing the saltiness of the soy sauce.
- Rice Vinegar: (2 tablespoons) Adds a tangy counterpoint to the sweetness and saltiness, brightening the overall flavor profile.
- Fresh Ginger: (1 tablespoon, grated) Infuses the glaze with a warm, zesty aroma and flavor, crucial for an authentic Asian-inspired taste.
- Garlic: (2 cloves, minced) Provides a pungent and savory base note to the glaze, complementing the ginger.
- Sesame Oil: (1 tablespoon) Adds a nutty aroma and flavor, enhancing the Asian-inspired character of the dish.
- Cornstarch: (1 tablespoon) Thickens the glaze to create its signature sticky consistency.
- Water: (1/4 cup) Helps to balance the glaze and ensures it coats the chicken evenly.
- Broccoli Florets: (1 head, cut into bite-sized pieces) Adds a healthy and vibrant green element to the bowl, offering a slightly bitter counterpoint.
- Carrots: (2 medium, sliced or shredded) Provides sweetness, color, and a satisfying crunch to the bowls.
- Green Onions: (2-3, thinly sliced) Used as a fresh garnish, adding a mild oniony flavor and visual appeal.
- Sesame Seeds: (For garnish) Adds a nutty flavor and visual texture to the finished bowls.
- Optional Toppings: (Sriracha, chopped peanuts, cilantro, etc.) Allows for customization and adds extra layers of flavor and texture.
Instructions
- Prepare the Chicken: Begin by cutting the boneless, skinless chicken thighs into bite-sized pieces, about 1-inch cubes. This will ensure the chicken cooks quickly and evenly, and that each piece is well-coated in the delicious sticky glaze. Set aside.
- Whisk Together the Glaze: In a medium-sized bowl, whisk together the soy sauce, honey, rice vinegar, grated fresh ginger, minced garlic, sesame oil, cornstarch, and water. Ensure that the cornstarch is fully dissolved to prevent any lumps in your glaze. This mixture is the heart of the dish, providing that irresistible sweet, savory, and sticky coating for the chicken. Taste and adjust seasonings if needed – you might want a touch more honey for sweetness or soy sauce for saltiness, depending on your preference.
- Cook the Chicken: Heat a large skillet or wok over medium-high heat. Add a tablespoon of cooking oil (vegetable, canola, or coconut oil works well). Once the oil is hot, add the cubed chicken to the skillet in a single layer, being careful not to overcrowd the pan. If necessary, cook the chicken in batches to ensure proper browning. Sear the chicken on all sides until it is nicely browned and cooked through. This step is crucial for developing flavor and ensuring the chicken is tender and juicy. Avoid overcooking, as this can make the chicken dry.
- Add the Glaze and Simmer: Once the chicken is cooked through, reduce the heat to medium-low and pour the prepared glaze over the chicken in the skillet. Stir to ensure that all pieces of chicken are evenly coated with the glaze. Let the mixture simmer for about 5-7 minutes, or until the glaze has thickened and become sticky, clinging beautifully to the chicken. Stir occasionally to prevent sticking and ensure even cooking. As the glaze simmers, it will reduce and intensify in flavor, creating that signature stickiness.
- Steam or Sauté the Vegetables: While the chicken is simmering in the glaze, prepare your vegetables. You can steam the broccoli florets until they are tender-crisp and lightly bright green. Alternatively, you can sauté them in a separate pan with a little oil and a pinch of salt until they are slightly softened and lightly browned. For the carrots, you can either add them to the skillet with the broccoli during the last few minutes of steaming/sautéing to soften slightly, or keep them raw for a satisfying crunch in the bowls. If you prefer softer carrots, you can sauté or steam them for a few minutes.
- Assemble the Rice Bowls: Now it’s time to assemble your Sticky Chicken Rice Bowls. Divide the cooked rice evenly among bowls. Spoon a generous portion of the sticky glazed chicken over the rice. Arrange the cooked broccoli florets and sliced or shredded carrots around the chicken.
- Garnish and Serve: Garnish each bowl with thinly sliced green onions and sesame seeds. For an extra kick, offer optional toppings like sriracha for heat, chopped peanuts for crunch, or fresh cilantro for a fresh herbal note. Serve immediately and enjoy the delightful combination of flavors and textures in your homemade Sticky Chicken Rice Bowls!
Nutrition
- Serving Size: one normal portion
- Calories: 550
- Protein: 40g


