")

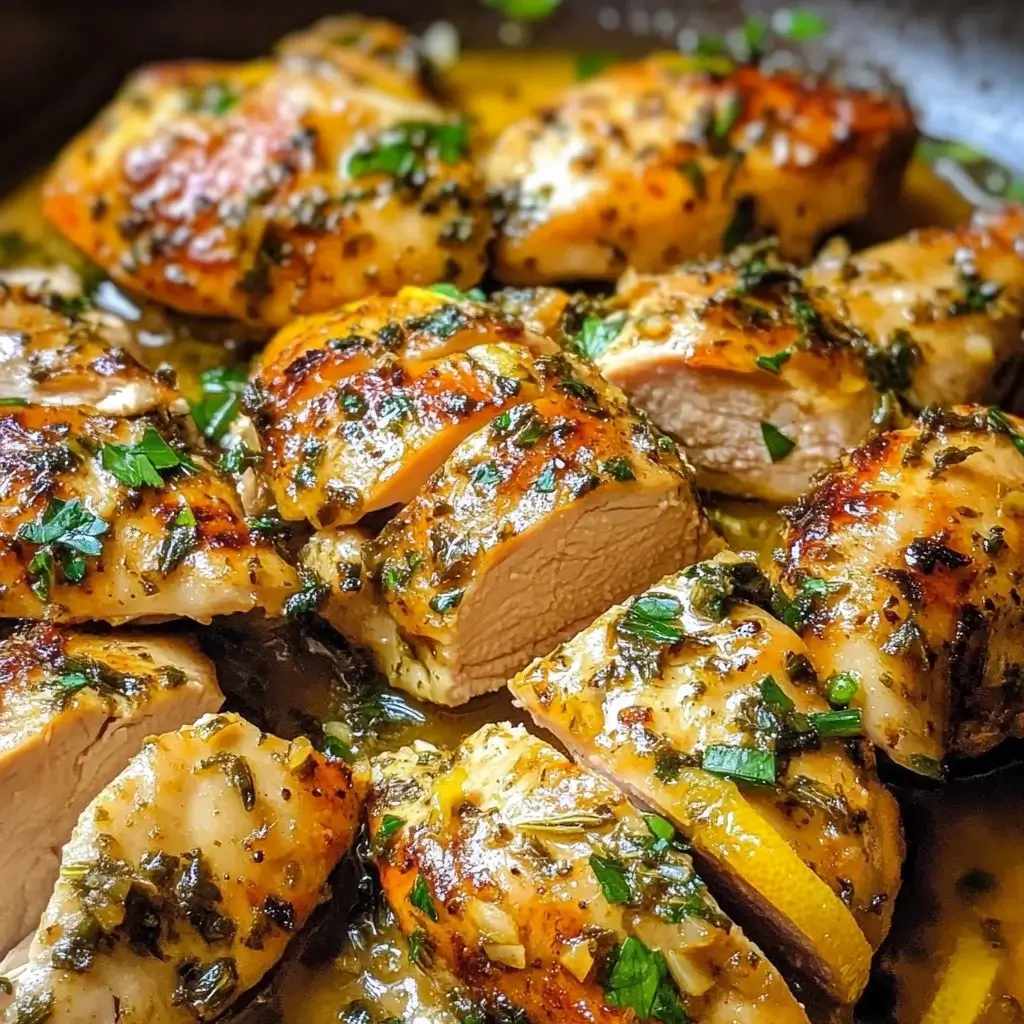

There are certain recipes that become legends in a household, the ones requested week after week, the ones that smell so incredible while cooking that everyone magically gravitates towards the kitchen. For my family, this Stovetop Lemon Garlic Chicken is firmly in that legendary category. I still remember the first time I made it – I was looking for something quick but elegant for a weeknight dinner that felt a bit special. The combination of bright, zesty lemon and pungent, savory garlic seemed promising, and cooking it entirely on the stovetop appealed to my desire for minimal cleanup. From the moment the garlic hit the hot pan, filling the air with its intoxicating aroma, I had a feeling this would be good. But “good” turned out to be an understatement. The chicken seared to a perfect golden-brown, locking in its juices, while the simple pan sauce – a glorious emulsion of butter, garlic, lemon juice, and chicken broth – coated each piece in tangy, savory goodness. My partner, usually reserved with praise, immediately asked what this “amazing chicken” was. My kids, notorious picky eaters, devoured their portions without a single complaint, even asking for more sauce to drizzle over their sides. Since that first success, it’s become our go-to. It’s the dish I make when I want guaranteed dinner success, when friends come over unexpectedly, or when I just crave something comforting yet vibrant. The beauty lies in its simplicity, using everyday ingredients to create something truly restaurant-worthy right on your own stovetop. It’s proof that you don’t need complicated techniques or obscure ingredients to make a meal that feels special and leaves everyone satisfied and asking for seconds. The bright acidity of the lemon cuts through the richness of the butter and garlic, creating a perfectly balanced flavor profile that’s both refreshing and deeply satisfying. It’s a culinary workhorse – reliable, adaptable, and consistently delicious.
Ingredients
Here’s what you’ll need to create this mouthwatering Stovetop Lemon Garlic Chicken:
- Boneless, Skinless Chicken Breasts – 4 medium-sized (about 6-8 oz each): The star of the show. Choose breasts of similar thickness for even cooking. You can also use boneless, skinless chicken thighs if you prefer darker meat; adjust cooking time accordingly.
- All-Purpose Flour – 1/4 cup: For dredging the chicken. This creates a light crust that helps brown the chicken beautifully and slightly thickens the pan sauce. You can use gluten-free all-purpose flour for a gluten-free version.
- Salt – 1 teaspoon (or to taste): Essential for seasoning the chicken and enhancing all the flavors. Use kosher or sea salt for best results.
- Black Pepper – 1/2 teaspoon (freshly ground preferred): Adds a touch of warmth and spice. Freshly ground pepper offers superior flavor compared to pre-ground.
- Olive Oil – 2 tablespoons: Used for searing the chicken. Choose a good quality extra virgin olive oil for flavor, or a light olive oil for a higher smoke point.
- Unsalted Butter – 3 tablespoons: Adds richness, flavor, and helps create a luscious pan sauce. Using unsalted allows you to control the final saltiness of the dish.
- Garlic – 4-6 cloves, minced: The aromatic heart of the dish. Adjust the amount based on your love for garlic! Freshly minced garlic provides the best flavor.
- Low-Sodium Chicken Broth – 1/2 cup: Forms the base of the pan sauce, adding depth and savory notes. Low-sodium allows better control over the salt level. Vegetable broth or even dry white wine can be substituted.
- Fresh Lemon Juice – 1/4 cup (from 1-2 lemons): Provides the signature bright, tangy flavor. Freshly squeezed juice is vastly superior to bottled.
- Lemon Zest – 1 teaspoon (optional, but recommended): Adds an extra layer of intense lemon aroma and flavor without adding more acidity. Zest the lemon before juicing it.
- Fresh Parsley – 2 tablespoons, chopped: For garnish. Adds a pop of color and fresh, herbaceous notes that complement the lemon and garlic perfectly. Flat-leaf (Italian) parsley is generally preferred.
Instructions
Follow these steps carefully to achieve perfectly cooked, flavorful lemon garlic chicken:
- Prepare the Chicken: Pat the chicken breasts completely dry with paper towels. This is crucial for achieving a good sear. If the breasts are very thick (over 1 inch), you can either slice them in half horizontally to create thinner cutlets or place them between sheets of plastic wrap and gently pound them to an even thickness (about 3/4 inch). Pounding ensures faster and more even cooking.
- Season and Dredge: In a shallow dish or on a plate, combine the all-purpose flour, 1 teaspoon of salt, and 1/2 teaspoon of black pepper. Whisk them together. Dredge each chicken breast in the flour mixture, coating all sides lightly. Shake off any excess flour. This light coating helps create a golden crust and slightly thickens the sauce later.
- Heat the Pan: Place a large skillet (cast iron, stainless steel, or heavy-bottomed non-stick) over medium-high heat. Add the 2 tablespoons of olive oil. Allow the oil to heat up until it shimmers or a speck of flour sizzles instantly when dropped in. Getting the pan hot enough is key for a good sear.
- Sear the Chicken: Carefully place the dredged chicken breasts into the hot skillet, ensuring not to overcrowd the pan (work in batches if necessary). Sear the chicken for 4-6 minutes per side, undisturbed, until golden brown and cooked through. The internal temperature should reach 165°F (74°C) when checked with a meat thermometer in the thickest part. Adjust cooking time based on chicken thickness. Don’t flip it too early; let the crust develop.
- Remove Chicken: Once cooked, transfer the chicken breasts from the skillet to a clean plate. Tent loosely with foil to keep warm while you prepare the sauce. Don’t wipe out the skillet; those browned bits (fond) left behind are packed with flavor!
- Sauté Aromatics: Reduce the heat under the skillet to medium. Add the 3 tablespoons of unsalted butter to the pan. Once the butter has melted and foamed slightly, add the minced garlic. Sauté the garlic for about 30-60 seconds, stirring constantly, until it becomes fragrant. Be very careful not to burn the garlic, as it will turn bitter.
- Deglaze and Build Sauce: Pour in the 1/2 cup of chicken broth and the 1/4 cup of fresh lemon juice. Bring the mixture to a simmer, scraping the bottom of the pan with a wooden spoon or whisk to release all those flavorful browned bits (fond) into the liquid. This deglazing step is essential for a rich sauce.
- Simmer and Thicken: Let the sauce simmer gently for 3-5 minutes, allowing it to reduce slightly and the flavors to meld. If using, stir in the lemon zest now. Taste the sauce and adjust seasoning if necessary, adding more salt or pepper if needed. If the sauce seems too thin, you can let it simmer a bit longer or mix 1 teaspoon of cornstarch with 1 tablespoon of cold water and whisk it into the sauce to thicken.
- Return Chicken to Pan: Place the cooked chicken breasts back into the skillet, nestling them into the sauce. Spoon some of the sauce over the top of each chicken breast. Let the chicken simmer gently in the sauce for another 1-2 minutes, just to reheat and allow it to absorb some of the sauce’s flavor.
- Garnish and Serve: Turn off the heat. Sprinkle the chopped fresh parsley over the chicken and sauce. Serve immediately, spooning extra lemon garlic sauce over the chicken and any accompanying sides.
Nutrition Facts
- Servings: 4
- Calories per serving: Approximately 350-450 kcal (This is an estimate and can vary based on the exact size of chicken breasts, amount of oil absorbed, and specific ingredients used).
- Protein: High (approx. 35-45g): Chicken breast is an excellent source of lean protein, crucial for muscle building and satiety.
- Fat: Moderate (approx. 15-25g): Primarily from olive oil and butter. Contains both unsaturated and saturated fats. Using less butter or oil can reduce this.
- Sodium: Moderate (approx. 600-800mg): Comes mainly from added salt and chicken broth. Using low-sodium broth and controlling added salt helps manage intake.
- Carbohydrates: Low (approx. 5-10g): Mostly from the flour dredge. This makes it relatively low-carb and suitable for many dietary approaches.
Disclaimer: Nutritional information is estimated and provided for informational purposes only. Actual values may vary based on specific ingredients and preparation methods.
Preparation Time
This Stovetop Lemon Garlic Chicken is designed for efficiency without sacrificing flavor.
- Prep time: Approximately 10-15 minutes (Includes patting dry, pounding if necessary, seasoning, dredging chicken, mincing garlic, juicing/zesting lemon).
- Cook time: Approximately 20-25 minutes (Includes searing chicken, sautéing garlic, creating and simmering the sauce, and finishing the chicken).
- Total time: Approximately 30-40 minutes. This makes it an ideal recipe for busy weeknights when you want a delicious, home-cooked meal without spending hours in the kitchen.
How to Serve
This versatile Stovetop Lemon Garlic Chicken pairs wonderfully with a variety of side dishes. Here are some serving suggestions to create a complete and satisfying meal:
- Starches (to soak up the delicious sauce):
- Fluffy Rice: Simple white rice, brown rice, or even quinoa provides a neutral base that lets the lemon garlic flavor shine.
- Pasta: Angel hair, linguine, or fettuccine tossed lightly with olive oil and parsley are excellent choices. The sauce coats the pasta beautifully.
- Mashed Potatoes: Creamy mashed potatoes (garlic mashed potatoes would be divine!) are perfect comfort food companions.
- Roasted Potatoes: Crispy roasted potatoes, perhaps seasoned with rosemary, offer a lovely textural contrast.
- Crusty Bread: A good quality baguette or sourdough loaf is essential for mopping up every last drop of that incredible pan sauce.
- Vegetables:
- Steamed or Roasted Asparagus: Its slightly earthy flavor complements the lemon beautifully. Drizzle with a little sauce.
- Sautéed Green Beans: Quick-sautéed with a little garlic or almonds.
- Steamed Broccoli or Broccolini: Simple, healthy, and adds a vibrant green color to the plate.
- Roasted Brussels Sprouts: Their slight bitterness balances the richness of the sauce.
- Simple Side Salad: A light green salad with a vinaigrette dressing provides a fresh counterpoint.
- Sautéed Spinach or Kale: Wilted quickly with a touch of garlic.
- Garnish:
- Extra Fresh Parsley: Reinforces the fresh flavor.
- Lemon Wedges: Allows guests to add an extra squeeze of fresh lemon juice if desired.
- Red Pepper Flakes: For those who like a little heat, a small sprinkle adds a nice kick.
- Presentation:
- Serve the chicken on a platter family-style, drizzled generously with the sauce and sprinkled with parsley.
- Alternatively, plate individual servings with the chicken placed alongside or on top of the chosen starch and vegetable, ensuring plenty of sauce is spooned over everything.
Additional Tips
Elevate your Stovetop Lemon Garlic Chicken game with these helpful tips:
- Choose Your Chicken Wisely: While chicken breasts are lean and popular, boneless, skinless chicken thighs offer more flavor and are more forgiving (less likely to dry out) due to their higher fat content. Adjust cooking time slightly as thighs may take a minute or two longer per side.
- Don’t Skip Pounding (If Necessary): If your chicken breasts are uneven or very thick, pounding them to an even 3/4-inch thickness is key. It ensures the chicken cooks through evenly without the thinner parts drying out while the thicker parts finish. Use the flat side of a meat mallet or a rolling pin.
- Achieve the Perfect Sear: Ensure your pan and oil are properly heated before adding the chicken. Don’t move the chicken around constantly while searing; let it sit undisturbed to develop that beautiful golden-brown crust. Avoid overcrowding the pan, as this lowers the temperature and causes the chicken to steam rather than sear. Cook in batches if needed.
- Control the Garlic: Burnt garlic tastes bitter and can ruin the dish. Sauté the minced garlic over medium heat just until fragrant (30-60 seconds) after searing the chicken and reducing the heat. If you’re worried, add the garlic along with the butter and stir constantly.
- Fresh Lemon is Key: Always use freshly squeezed lemon juice. Bottled lemon juice lacks the brightness and complex flavor of fresh lemons and can sometimes have a metallic or artificial aftertaste. Zesting the lemon before juicing adds an extra layer of intense lemon essence to the sauce.
- Sauce Consistency: If your sauce is too thin, let it simmer a few minutes longer to reduce and concentrate. If it’s too thick, whisk in a tablespoon or two of extra chicken broth or warm water until it reaches your desired consistency. A cornstarch slurry (1 tsp cornstarch + 1 tbsp cold water) can also be used for quick thickening if needed.
- Add Wine for Depth: For a slightly more complex flavor profile, substitute some or all of the chicken broth with a dry white wine like Pinot Grigio or Sauvignon Blanc. Add the wine to deglaze the pan before adding the broth and lemon juice, letting it simmer for a minute to cook off the alcohol.
- Herb Variations: While parsley is classic, feel free to experiment with other herbs. Fresh thyme sprigs added while the sauce simmers, or a sprinkle of fresh rosemary or chives at the end can add different aromatic dimensions that pair well with lemon and garlic.
Frequently Asked Questions (FAQ)
Here are answers to some common questions about making Stovetop Lemon Garlic Chicken:
- Can I use frozen chicken breasts?
It’s highly recommended to thaw chicken breasts completely before cooking. Cooking from frozen can result in uneven cooking (outside overcooked, inside undercooked or raw) and prevents proper searing. Thaw overnight in the refrigerator for best results. If you must cook from partially frozen, expect longer cooking times and less browning. - Is it necessary to dredge the chicken in flour?
Dredging is recommended but not strictly necessary. The flour helps create a golden-brown crust, protects the chicken from drying out slightly, and naturally thickens the pan sauce as it cooks off. For a gluten-free version, use a gluten-free all-purpose flour blend or skip the dredging step altogether (the sauce might be slightly thinner). - Can I use bottled garlic or garlic powder instead of fresh garlic?
Freshly minced garlic provides the best, most potent flavor for this dish. Garlic powder can be used in a pinch (use about 1-1.5 teaspoons) added to the flour mixture or sauce, but it won’t have the same aromatic impact. Bottled minced garlic can be used, but it often has a slightly different, sometimes more acidic, flavor than fresh. - My sauce tastes too sour/lemony. How can I fix it?
If the sauce is too acidic, try balancing it with a touch more chicken broth, a little extra butter for richness, or even a tiny pinch of sugar (less than 1/4 teaspoon) to counteract the sourness. Taste and adjust gradually. - How do I store and reheat leftovers?
Store leftover chicken and sauce in an airtight container in the refrigerator for up to 3-4 days. To reheat, gently warm the chicken and sauce in a skillet over medium-low heat until heated through. You might need to add a splash of chicken broth or water to loosen the sauce. Avoid microwaving if possible, as it can make the chicken rubbery, although it works in a pinch (reheat in short bursts at lower power). - Can I add vegetables directly to the pan?
Yes! After removing the seared chicken, you could add quick-cooking vegetables like sliced mushrooms, chopped onions, bell peppers, or zucchini to the pan and sauté them for a few minutes before adding the garlic and proceeding with the sauce. Spinach or asparagus can be added towards the end, allowing them to wilt or cook briefly in the simmering sauce. - Why did my chicken turn out dry?
Dry chicken is usually a result of overcooking. Use a meat thermometer to ensure the chicken reaches an internal temperature of 165°F (74°C) and no higher. Pounding the chicken to an even thickness helps prevent overcooking the thinner parts. Also, ensure you don’t cook it too long during the searing phase or when simmering it in the sauce at the end. Using chicken thighs instead of breasts can also help prevent dryness. - Can I make this recipe creamy?
Absolutely! To make a creamy lemon garlic chicken, stir in 1/4 to 1/2 cup of heavy cream or half-and-half into the sauce during the final few minutes of simmering (step 8). Let it heat through gently, but avoid boiling it rapidly after adding cream. A dollop of cream cheese or mascarpone could also be whisked in for creaminess and tang.

Stovetop Lemon Garlic Chicken
Ingredients
Here’s what you’ll need to create this mouthwatering Stovetop Lemon Garlic Chicken:
- Boneless, Skinless Chicken Breasts – 4 medium-sized (about 6-8 oz each): The star of the show. Choose breasts of similar thickness for even cooking. You can also use boneless, skinless chicken thighs if you prefer darker meat; adjust cooking time accordingly.
- All-Purpose Flour – 1/4 cup: For dredging the chicken. This creates a light crust that helps brown the chicken beautifully and slightly thickens the pan sauce. You can use gluten-free all-purpose flour for a gluten-free version.
- Salt – 1 teaspoon (or to taste): Essential for seasoning the chicken and enhancing all the flavors. Use kosher or sea salt for best results.
- Black Pepper – 1/2 teaspoon (freshly ground preferred): Adds a touch of warmth and spice. Freshly ground pepper offers superior flavor compared to pre-ground.
- Olive Oil – 2 tablespoons: Used for searing the chicken. Choose a good quality extra virgin olive oil for flavor, or a light olive oil for a higher smoke point.
- Unsalted Butter – 3 tablespoons: Adds richness, flavor, and helps create a luscious pan sauce. Using unsalted allows you to control the final saltiness of the dish.
- Garlic – 4-6 cloves, minced: The aromatic heart of the dish. Adjust the amount based on your love for garlic! Freshly minced garlic provides the best flavor.
- Low-Sodium Chicken Broth – 1/2 cup: Forms the base of the pan sauce, adding depth and savory notes. Low-sodium allows better control over the salt level. Vegetable broth or even dry white wine can be substituted.
- Fresh Lemon Juice – 1/4 cup (from 1-2 lemons): Provides the signature bright, tangy flavor. Freshly squeezed juice is vastly superior to bottled.
- Lemon Zest – 1 teaspoon (optional, but recommended): Adds an extra layer of intense lemon aroma and flavor without adding more acidity. Zest the lemon before juicing it.
- Fresh Parsley – 2 tablespoons, chopped: For garnish. Adds a pop of color and fresh, herbaceous notes that complement the lemon and garlic perfectly. Flat-leaf (Italian) parsley is generally preferred.
Instructions
Follow these steps carefully to achieve perfectly cooked, flavorful lemon garlic chicken:
- Prepare the Chicken: Pat the chicken breasts completely dry with paper towels. This is crucial for achieving a good sear. If the breasts are very thick (over 1 inch), you can either slice them in half horizontally to create thinner cutlets or place them between sheets of plastic wrap and gently pound them to an even thickness (about 3/4 inch). Pounding ensures faster and more even cooking.
- Season and Dredge: In a shallow dish or on a plate, combine the all-purpose flour, 1 teaspoon of salt, and 1/2 teaspoon of black pepper. Whisk them together. Dredge each chicken breast in the flour mixture, coating all sides lightly. Shake off any excess flour. This light coating helps create a golden crust and slightly thickens the sauce later.
- Heat the Pan: Place a large skillet (cast iron, stainless steel, or heavy-bottomed non-stick) over medium-high heat. Add the 2 tablespoons of olive oil. Allow the oil to heat up until it shimmers or a speck of flour sizzles instantly when dropped in. Getting the pan hot enough is key for a good sear.
- Sear the Chicken: Carefully place the dredged chicken breasts into the hot skillet, ensuring not to overcrowd the pan (work in batches if necessary). Sear the chicken for 4-6 minutes per side, undisturbed, until golden brown and cooked through. The internal temperature should reach 165°F (74°C) when checked with a meat thermometer in the thickest part. Adjust cooking time based on chicken thickness. Don’t flip it too early; let the crust develop.
- Remove Chicken: Once cooked, transfer the chicken breasts from the skillet to a clean plate. Tent loosely with foil to keep warm while you prepare the sauce. Don’t wipe out the skillet; those browned bits (fond) left behind are packed with flavor!
- Sauté Aromatics: Reduce the heat under the skillet to medium. Add the 3 tablespoons of unsalted butter to the pan. Once the butter has melted and foamed slightly, add the minced garlic. Sauté the garlic for about 30-60 seconds, stirring constantly, until it becomes fragrant. Be very careful not to burn the garlic, as it will turn bitter.
- Deglaze and Build Sauce: Pour in the 1/2 cup of chicken broth and the 1/4 cup of fresh lemon juice. Bring the mixture to a simmer, scraping the bottom of the pan with a wooden spoon or whisk to release all those flavorful browned bits (fond) into the liquid. This deglazing step is essential for a rich sauce.
- Simmer and Thicken: Let the sauce simmer gently for 3-5 minutes, allowing it to reduce slightly and the flavors to meld. If using, stir in the lemon zest now. Taste the sauce and adjust seasoning if necessary, adding more salt or pepper if needed. If the sauce seems too thin, you can let it simmer a bit longer or mix 1 teaspoon of cornstarch with 1 tablespoon of cold water and whisk it into the sauce to thicken.
- Return Chicken to Pan: Place the cooked chicken breasts back into the skillet, nestling them into the sauce. Spoon some of the sauce over the top of each chicken breast. Let the chicken simmer gently in the sauce for another 1-2 minutes, just to reheat and allow it to absorb some of the sauce’s flavor.
- Garnish and Serve: Turn off the heat. Sprinkle the chopped fresh parsley over the chicken and sauce. Serve immediately, spooning extra lemon garlic sauce over the chicken and any accompanying sides.
Nutrition
- Serving Size: one normal portion
- Calories: 450
- Sodium: 800mg
- Fat: 25g
- Carbohydrates: 10g
- Protein: 45g


