Ingredients
- High-Quality White Chocolate Chips (2 cups): The star of the show, providing the creamy base and sweet flavor for our fudge. Opt for good quality white chocolate for the best taste and melting consistency.
- Sweetened Condensed Milk (1 (14 ounce) can): Adds richness, sweetness, and that signature fudgy texture, binding all the ingredients together beautifully.
- Unsalted Butter (1/4 cup): Contributes to the smooth and luxurious texture of the fudge and enhances the overall flavor profile.
- Pure Vanilla Extract (1 teaspoon): Infuses the fudge with a delicate and warm vanilla aroma, complementing the sweetness of the white chocolate. Use pure vanilla extract for the most authentic flavor.
- Pinch of Salt: Balances the sweetness and enhances the other flavors, preventing the fudge from being overly sugary.
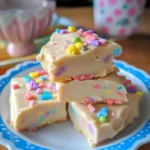
- Optional: Bunny Sprinkles or Pastel Candies: For a festive touch and visual appeal, especially perfect for Easter and bunny-themed celebrations.
Instructions
- Prepare Your Pan: Line an 8×8 inch square baking pan with parchment paper, leaving an overhang on the sides. This will make it easy to lift the fudge out once it’s set. The parchment paper prevents sticking and ensures clean removal.
- Combine Ingredients in a Microwave-Safe Bowl: In a large microwave-safe bowl, combine the white chocolate chips, sweetened condensed milk, and unsalted butter. Ensure the bowl is large enough to prevent spillage during microwaving.
- Microwave in Intervals: Microwave the mixture in 30-second intervals, stirring well after each interval. This prevents the white chocolate from burning and ensures even melting. Continue microwaving and stirring until the mixture is smooth and completely melted. Be patient and stir thoroughly after each interval to encourage even melting.
- Stir in Vanilla Extract and Salt: Once the mixture is smooth, stir in the vanilla extract and a pinch of salt. Mix until everything is well combined and the vanilla extract is evenly distributed throughout the fudge base. The vanilla extract enhances the flavor, and the salt balances the sweetness.
- Pour into Prepared Pan: Pour the melted fudge mixture into the parchment-lined baking pan. Use a spatula to spread it evenly to the edges of the pan, ensuring a uniform thickness for your fudge squares.
- Add Sprinkles (Optional): If desired, immediately sprinkle bunny sprinkles or pastel candies over the top of the fudge while it’s still soft. Gently press them into the surface so they adhere as the fudge sets. This adds a festive and decorative touch.
- Chill to Set: Cover the pan with plastic wrap and refrigerate for at least 2-3 hours, or preferably overnight, to allow the fudge to fully set and firm up. Chilling is crucial for achieving the right fudge consistency.
- Cut into Squares: Once the fudge is firm, lift it out of the pan using the parchment paper overhang. Place it on a cutting board and cut it into even squares. Use a sharp knife and wipe it clean between cuts for neat edges. You can cut them into squares, rectangles, or even use cookie cutters for fun shapes, especially for bunny shapes during Easter.
- Serve and Enjoy: Your Vanilla Bunny Fudge is now ready to serve! Store any leftover fudge in an airtight container in the refrigerator to maintain its freshness and texture.
Nutrition
- Serving Size: one normal portion
- Calories: 250
- Fat: 15g