")


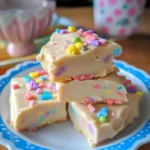
It’s hard to believe Easter is just around the corner! This year, I wanted to try something a little different from our usual chocolate overload. While browsing for festive treats, I stumbled upon a Vanilla Bunny Fudge recipe, and let me tell you, it was a game-changer! From the moment I started melting the white chocolate, the sweet vanilla aroma filled my kitchen, instantly lifting my spirits. The recipe itself was incredibly easy, even my kids could help out, which is always a bonus. The fudge set beautifully, creating smooth, creamy squares that were simply irresistible. When I served it at our Easter gathering, it vanished within minutes! Everyone, from the little ones to the grandparents, raved about the delicate vanilla flavor and the melt-in-your-mouth texture. It was the perfect balance of sweetness without being overly rich, making it a delightful spring treat. Honestly, this Vanilla Bunny Fudge is not just delicious; it’s also incredibly charming with its pure white appearance, perfect for adding a touch of elegance to your Easter dessert table. It’s become a new family favorite, and I know it will be a staple in our Easter celebrations for years to come. If you’re looking for a simple yet impressive dessert that screams springtime, you absolutely have to try this recipe. You won’t be disappointed!
Ingredients
- High-Quality White Chocolate Chips (2 cups): The star of the show, providing the creamy base and sweet flavor for our fudge. Opt for good quality white chocolate for the best taste and melting consistency.
- Sweetened Condensed Milk (1 (14 ounce) can): Adds richness, sweetness, and that signature fudgy texture, binding all the ingredients together beautifully.
- Unsalted Butter (1/4 cup): Contributes to the smooth and luxurious texture of the fudge and enhances the overall flavor profile.
- Pure Vanilla Extract (1 teaspoon): Infuses the fudge with a delicate and warm vanilla aroma, complementing the sweetness of the white chocolate. Use pure vanilla extract for the most authentic flavor.
- Pinch of Salt: Balances the sweetness and enhances the other flavors, preventing the fudge from being overly sugary.
- Optional: Bunny Sprinkles or Pastel Candies: For a festive touch and visual appeal, especially perfect for Easter and bunny-themed celebrations.
Instructions
- Prepare Your Pan: Line an 8×8 inch square baking pan with parchment paper, leaving an overhang on the sides. This will make it easy to lift the fudge out once it’s set. The parchment paper prevents sticking and ensures clean removal.
- Combine Ingredients in a Microwave-Safe Bowl: In a large microwave-safe bowl, combine the white chocolate chips, sweetened condensed milk, and unsalted butter. Ensure the bowl is large enough to prevent spillage during microwaving.
- Microwave in Intervals: Microwave the mixture in 30-second intervals, stirring well after each interval. This prevents the white chocolate from burning and ensures even melting. Continue microwaving and stirring until the mixture is smooth and completely melted. Be patient and stir thoroughly after each interval to encourage even melting.
- Stir in Vanilla Extract and Salt: Once the mixture is smooth, stir in the vanilla extract and a pinch of salt. Mix until everything is well combined and the vanilla extract is evenly distributed throughout the fudge base. The vanilla extract enhances the flavor, and the salt balances the sweetness.
- Pour into Prepared Pan: Pour the melted fudge mixture into the parchment-lined baking pan. Use a spatula to spread it evenly to the edges of the pan, ensuring a uniform thickness for your fudge squares.
- Add Sprinkles (Optional): If desired, immediately sprinkle bunny sprinkles or pastel candies over the top of the fudge while it’s still soft. Gently press them into the surface so they adhere as the fudge sets. This adds a festive and decorative touch.
- Chill to Set: Cover the pan with plastic wrap and refrigerate for at least 2-3 hours, or preferably overnight, to allow the fudge to fully set and firm up. Chilling is crucial for achieving the right fudge consistency.
- Cut into Squares: Once the fudge is firm, lift it out of the pan using the parchment paper overhang. Place it on a cutting board and cut it into even squares. Use a sharp knife and wipe it clean between cuts for neat edges. You can cut them into squares, rectangles, or even use cookie cutters for fun shapes, especially for bunny shapes during Easter.
- Serve and Enjoy: Your Vanilla Bunny Fudge is now ready to serve! Store any leftover fudge in an airtight container in the refrigerator to maintain its freshness and texture.
Nutrition Facts
(Per Serving, based on 16 servings)
- Serving Size: 1 square (approximately 2 inches x 2 inches)
- Calories: Approximately 220-250 kcal
- Fat: 12-15g
Note: Nutritional values are estimates and can vary based on specific ingredients and brands used.
Preparation Time
- Prep Time: 10-15 minutes (This includes gathering ingredients, preparing the pan, and mixing the fudge.)
- Cook Time: 5-7 minutes (Microwaving time, in intervals)
- Chill Time: 2-3 hours minimum (Ideally overnight for best results)
- Total Time: Approximately 2 hours 15 minutes to 3 hours (including chilling time)
This Vanilla Bunny Fudge recipe is quick and easy to prepare, with most of the time spent waiting for the fudge to chill and set. It’s a perfect make-ahead dessert for parties and gatherings.
How to Serve Vanilla Bunny Fudge
This delightful Vanilla Bunny Fudge is incredibly versatile and can be served in numerous ways to enhance your dessert experience. Here are some creative and classic serving suggestions:
- Classic Dessert Platter:
- Arrange the fudge squares on a beautiful dessert platter alongside other Easter treats like pastel macarons, chocolate bunnies, and mini cupcakes.
- The white fudge provides a lovely contrast in color and texture to richer, darker desserts.
- Garnish the platter with fresh berries like raspberries and blueberries for a pop of color and freshness.
- Easter Basket Treat:
- Cut the fudge into bunny shapes using cookie cutters and wrap them individually in cellophane bags tied with pastel ribbons.
- Include these adorable fudge bunnies in Easter baskets as a homemade and charming surprise.
- This is a thoughtful and personalized touch that children and adults alike will appreciate.
- Party Favors:
- Package small portions of fudge (2-3 squares) in decorative boxes or organza bags.
- These make wonderful party favors for Easter gatherings, spring brunches, or bunny-themed birthday parties.
- Add a personalized tag with a thank you message or the recipe name for a special touch.
- Coffee or Tea Accompaniment:
- Serve a square of Vanilla Bunny Fudge alongside a hot cup of coffee, tea, or even a glass of iced coffee.
- The creamy sweetness of the fudge complements the bitterness of coffee and the warmth of tea perfectly.
- It’s a delightful afternoon treat or after-dinner indulgence.
- Ice Cream Sundae Topping:
- Crumble the fudge into small pieces and sprinkle them over vanilla or strawberry ice cream sundaes.
- The fudge adds a delightful crunch and intense vanilla flavor to the creamy ice cream.
- Combine with other toppings like whipped cream, chocolate sauce, and cherries for an extra decadent sundae.
- Layered Dessert Parfaits:
- Create elegant dessert parfaits by layering crumbled Vanilla Bunny Fudge with vanilla pudding or mousse, fresh berries, and whipped cream.
- Serve in tall glasses or mason jars for a visually appealing and delicious dessert.
- This is a sophisticated way to present the fudge and adds complexity to the flavor profile.
- Cheese Board Addition (Unexpected Delight):
- Surprisingly, the sweetness of white chocolate fudge can pair well with certain cheeses, especially mild and creamy varieties like brie or mascarpone.
- Include small squares of fudge on a cheese board for an unexpected sweet element that intrigues guests.
- Offer alongside crackers, fruits, and nuts for a well-rounded and sophisticated cheese and dessert platter.
- Simple and Elegant Presentation:
- For a minimalist and elegant approach, simply arrange the fudge squares on a clean white plate.
- Dust lightly with powdered sugar for a snowy effect or add a single fresh raspberry or mint leaf for a touch of color.
- This understated presentation highlights the pure white beauty of the Vanilla Bunny Fudge itself.
Additional Tips for Perfect Vanilla Bunny Fudge
Making perfect fudge is easier than you might think, but a few key tips can elevate your Vanilla Bunny Fudge from good to absolutely amazing. Here are eight additional tips to ensure your fudge is a resounding success every time:
- Use High-Quality White Chocolate: The quality of your white chocolate significantly impacts the flavor and texture of your fudge. Opt for good quality white chocolate chips or a baking bar. Avoid “candy melts” or imitation white chocolate as they often lack the true vanilla and cocoa butter flavor and may not melt as smoothly. Real white chocolate will give you a richer, creamier, and more flavorful fudge.
- Don’t Overcook the Fudge: Overheating white chocolate can cause it to seize or become grainy. Microwave in short intervals (30 seconds or less) and stir thoroughly after each interval. The goal is to gently melt the chocolate, not cook it. Once the mixture is mostly melted, the residual heat will melt the remaining chocolate as you stir.
- Stir Thoroughly and Gently: Stir the fudge mixture gently but thoroughly after each microwave interval. This helps distribute the heat evenly and ensures smooth melting. Avoid vigorous stirring, which can incorporate air and affect the texture. A spatula is ideal for scraping the bottom and sides of the bowl to ensure everything is well combined.
- Room Temperature Butter is Key: Using softened butter is crucial for smooth incorporation into the fudge mixture. Cold butter will not blend in properly and can lead to a grainy texture. Ensure your butter is at room temperature but not melted before you start.
- Patience is a Virtue (Chilling Time): Resist the urge to rush the chilling process. Fudge needs ample time to set properly in the refrigerator. At least 2-3 hours, but ideally overnight, will result in the best texture and allow the flavors to meld together beautifully. If you try to cut it too soon, it may be too soft and sticky.
- Line Your Pan for Easy Removal: Always line your baking pan with parchment paper, leaving an overhang on the sides. This simple step is a lifesaver when it comes to removing the fudge cleanly from the pan and cutting it into squares. The parchment paper acts as a sling, making the removal effortless and preventing the fudge from sticking to the pan.
- Customize with Flavors and Mix-Ins: While vanilla is the star, feel free to experiment with other flavors! Add a few drops of almond extract for a subtle nutty note, or a hint of lemon zest for a bright, citrusy twist. You can also mix in chopped nuts (like macadamia or almonds), dried cranberries, or mini marshmallows for added texture and flavor complexity.
- Proper Storage for Freshness: Store your Vanilla Bunny Fudge in an airtight container in the refrigerator to maintain its freshness and texture. It will stay fresh for up to a week, maybe even slightly longer. For longer storage, you can freeze the fudge in an airtight container for up to 2-3 months. Thaw it in the refrigerator overnight before serving. Storing it properly will prevent it from drying out or absorbing odors from the refrigerator.
Frequently Asked Questions (FAQ) about Vanilla Bunny Fudge
Q1: Can I make this fudge without a microwave?
A: Yes, absolutely! You can easily make this fudge on the stovetop. Simply combine the white chocolate chips, sweetened condensed milk, and butter in a saucepan over low heat. Stir constantly until everything is melted and smooth. Be careful not to overheat the mixture. Then, proceed with the rest of the recipe as instructed, stirring in the vanilla extract and salt before pouring into the pan to chill.
Q2: Can I use semi-sweet or dark chocolate instead of white chocolate?
A: While this recipe is specifically for Vanilla Bunny Fudge using white chocolate, you can certainly adapt it to use semi-sweet or dark chocolate for a different flavor profile. However, the taste and appearance will be different. You might need to adjust the amount of sweetened condensed milk depending on the sweetness of the chocolate you choose. For a chocolate fudge, consider reducing the sweetened condensed milk slightly as darker chocolates are less sweet.
Q3: My fudge is too soft and not setting properly. What did I do wrong?
A: The most common reason for fudge not setting properly is not chilling it for long enough. Ensure you refrigerate it for at least 2-3 hours, or preferably overnight. Another reason could be using low-quality white chocolate or not using enough white chocolate relative to the liquid ingredients. Make sure you are using proper white chocolate chips or a baking bar and follow the ingredient measurements accurately. In rare cases, very humid weather can also affect fudge setting, so chilling it for a longer duration might be necessary.
Q4: Can I add food coloring to make pastel-colored fudge?
A: Yes, you can definitely add gel food coloring to create pastel-colored Vanilla Bunny Fudge, perfect for Easter! Add a few drops of gel food coloring (liquid food coloring might alter the consistency) after the fudge mixture is melted and smooth, along with the vanilla extract. Stir until the color is evenly distributed. Start with a small amount and add more gradually to achieve your desired pastel shade.
Q5: How long does Vanilla Bunny Fudge last?
A: Stored properly in an airtight container in the refrigerator, Vanilla Bunny Fudge will stay fresh for up to a week. For longer storage, you can freeze it for 2-3 months. Thaw it in the refrigerator overnight before serving. Freezing is a great option if you want to make the fudge ahead of time for a party or event.
Q6: Can I add nuts to this fudge recipe?
A: Yes, adding nuts is a delicious way to customize your Vanilla Bunny Fudge! Chopped nuts like macadamia, almonds, pecans, or walnuts would complement the vanilla flavor beautifully. Stir in about 1/2 to 1 cup of your favorite chopped nuts after you’ve melted the fudge base and removed it from the heat, just before pouring it into the pan to chill.
Q7: What are some other topping ideas besides bunny sprinkles?
A: There are many fun and delicious toppings you can use to decorate your Vanilla Bunny Fudge! Consider:
* Pastel M&Ms or chocolate candies
* Shredded coconut, toasted or plain
* A drizzle of melted white chocolate or milk chocolate
* Chopped dried fruit like cranberries or apricots
* Sea salt flakes for a sweet and salty contrast
* Edible glitter for extra sparkle
* Crushed vanilla wafers or graham crackers
Q8: Is this recipe gluten-free?
A: Yes, the Vanilla Bunny Fudge recipe as written is naturally gluten-free, as it primarily consists of white chocolate, sweetened condensed milk, butter, vanilla extract, and salt. However, if you are adding toppings or mix-ins, ensure that those ingredients are also certified gluten-free if you require a completely gluten-free dessert. Always check the labels of all ingredients to confirm they are gluten-free, especially if you have severe gluten sensitivities or allergies.
Vanilla Bunny Fudge Recipe
Ingredients
- High-Quality White Chocolate Chips (2 cups): The star of the show, providing the creamy base and sweet flavor for our fudge. Opt for good quality white chocolate for the best taste and melting consistency.
- Sweetened Condensed Milk (1 (14 ounce) can): Adds richness, sweetness, and that signature fudgy texture, binding all the ingredients together beautifully.
- Unsalted Butter (1/4 cup): Contributes to the smooth and luxurious texture of the fudge and enhances the overall flavor profile.
- Pure Vanilla Extract (1 teaspoon): Infuses the fudge with a delicate and warm vanilla aroma, complementing the sweetness of the white chocolate. Use pure vanilla extract for the most authentic flavor.
- Pinch of Salt: Balances the sweetness and enhances the other flavors, preventing the fudge from being overly sugary.
- Optional: Bunny Sprinkles or Pastel Candies: For a festive touch and visual appeal, especially perfect for Easter and bunny-themed celebrations.
Instructions
- Prepare Your Pan: Line an 8×8 inch square baking pan with parchment paper, leaving an overhang on the sides. This will make it easy to lift the fudge out once it’s set. The parchment paper prevents sticking and ensures clean removal.
- Combine Ingredients in a Microwave-Safe Bowl: In a large microwave-safe bowl, combine the white chocolate chips, sweetened condensed milk, and unsalted butter. Ensure the bowl is large enough to prevent spillage during microwaving.
- Microwave in Intervals: Microwave the mixture in 30-second intervals, stirring well after each interval. This prevents the white chocolate from burning and ensures even melting. Continue microwaving and stirring until the mixture is smooth and completely melted. Be patient and stir thoroughly after each interval to encourage even melting.
- Stir in Vanilla Extract and Salt: Once the mixture is smooth, stir in the vanilla extract and a pinch of salt. Mix until everything is well combined and the vanilla extract is evenly distributed throughout the fudge base. The vanilla extract enhances the flavor, and the salt balances the sweetness.
- Pour into Prepared Pan: Pour the melted fudge mixture into the parchment-lined baking pan. Use a spatula to spread it evenly to the edges of the pan, ensuring a uniform thickness for your fudge squares.
- Add Sprinkles (Optional): If desired, immediately sprinkle bunny sprinkles or pastel candies over the top of the fudge while it’s still soft. Gently press them into the surface so they adhere as the fudge sets. This adds a festive and decorative touch.
- Chill to Set: Cover the pan with plastic wrap and refrigerate for at least 2-3 hours, or preferably overnight, to allow the fudge to fully set and firm up. Chilling is crucial for achieving the right fudge consistency.
- Cut into Squares: Once the fudge is firm, lift it out of the pan using the parchment paper overhang. Place it on a cutting board and cut it into even squares. Use a sharp knife and wipe it clean between cuts for neat edges. You can cut them into squares, rectangles, or even use cookie cutters for fun shapes, especially for bunny shapes during Easter.
- Serve and Enjoy: Your Vanilla Bunny Fudge is now ready to serve! Store any leftover fudge in an airtight container in the refrigerator to maintain its freshness and texture.
Nutrition
- Serving Size: one normal portion
- Calories: 250
- Fat: 15g


