")


There’s something undeniably comforting about chocolate pudding. It evokes childhood memories, warm kitchens, and simple pleasures. But what if you could elevate this classic treat into something a little more sophisticated, yet still just as easy to make? That’s exactly what happened in my kitchen last week when I decided to whip up these Chocolate Pudding Parfaits. Honestly, I was looking for a dessert that wouldn’t require hours in the kitchen, something that would satisfy a sweet craving without being overly complicated. And boy, did these parfaits deliver! From the first spoonful of creamy, rich chocolate pudding layered with crunchy graham crackers and fluffy whipped cream, my family was hooked. Even my pickiest eater couldn’t get enough. What I loved most was how customizable they are; you can switch up the cookie layers, the toppings, even the pudding itself to create endless variations. If you’re searching for a dessert that’s both impressive and incredibly simple, look no further – these Chocolate Pudding Parfaits are about to become your new go-to sweet treat.
Ingredients
- Whole Milk: The base of our pudding, whole milk provides the richness and creamy texture we desire. You can use 2% milk for a slightly lighter version, but whole milk truly gives the best flavor and consistency.
- Granulated Sugar: Adds the perfect amount of sweetness to balance the cocoa and create a delightful dessert. Feel free to adjust slightly to your preference.
- Unsweetened Cocoa Powder: The star of the show! Use high-quality unsweetened cocoa powder for a deep, intense chocolate flavor. Dutch-processed cocoa will give a smoother, less bitter taste and a darker color.
- Cornstarch: Our thickening agent. Cornstarch is essential for creating that classic pudding texture, ensuring it’s thick and velvety smooth.
- Pinch of Salt: Enhances the flavors of the other ingredients, particularly the chocolate, and balances the sweetness.
- Vanilla Extract: A touch of vanilla extract rounds out the chocolate flavor and adds a warm, aromatic note. Use pure vanilla extract for the best results.
- Semi-Sweet Chocolate Chips (Optional): Adding chocolate chips at the end of cooking intensifies the chocolate flavor and adds little pockets of melty chocolate goodness throughout the pudding.
- Graham Crackers or Chocolate Cookies: For layering in the parfaits, providing a delightful textural contrast to the creamy pudding. You can use regular graham crackers, chocolate graham crackers, Oreos (without cream), or any other crisp cookie you enjoy.
- Whipped Cream or Yogurt: Adds a light and airy layer to the parfaits, contrasting beautifully with the richness of the chocolate pudding and the crunch of the cookies. You can use homemade whipped cream, store-bought whipped topping, or even Greek yogurt for a slightly healthier twist.
- Chocolate Shavings or Sprinkles (Optional): For garnish, adding a final touch of elegance and visual appeal to your parfaits.
Instructions
- Combine Dry Ingredients: In a medium saucepan, whisk together the granulated sugar, unsweetened cocoa powder, cornstarch, and salt. Whisking these dry ingredients together first helps to prevent any lumps from forming when you add the milk. Make sure everything is well combined and the cocoa powder is evenly distributed. This step is crucial for a smooth pudding base.
- Whisk in Milk: Gradually pour in the whole milk, whisking constantly until the mixture is smooth and there are no clumps of cocoa powder or cornstarch remaining. Ensure the milk is fully incorporated into the dry ingredients, creating a homogenous mixture. This gentle whisking process ensures a silky smooth pudding in the end.
- Cook and Thicken: Place the saucepan over medium heat and cook, stirring constantly with a whisk, until the mixture begins to thicken and comes to a gentle simmer. Continue to cook and stir for another 1-2 minutes, allowing the pudding to thicken further. You’ll know it’s ready when it coats the back of a spoon and leaves a clear trail when you run your finger through it. Be patient and keep stirring continuously to prevent scorching on the bottom of the pan. Lower the heat if necessary to maintain a gentle simmer.
- Stir in Vanilla and Chocolate Chips (Optional): Remove the saucepan from the heat and stir in the vanilla extract. If using chocolate chips, stir them in now as well, allowing them to melt into the warm pudding. Stir until the vanilla is fully incorporated and the chocolate chips are melted and evenly distributed throughout the pudding, creating a richer, more decadent flavor.
- Cool Slightly: Let the chocolate pudding cool slightly for about 10-15 minutes before assembling the parfaits. This will allow it to thicken a bit more and prevent it from melting the whipped cream too much when layering. You can also pour the pudding into a bowl and cover the surface directly with plastic wrap to prevent a skin from forming while it cools.
- Crush Cookies: While the pudding is cooling, prepare your cookie layers. If using graham crackers or cookies, crush them into coarse crumbs. You can do this by placing them in a zip-top bag and using a rolling pin or the bottom of a heavy pan to crush them. Don’t crush them too finely; you want some texture in your parfaits.
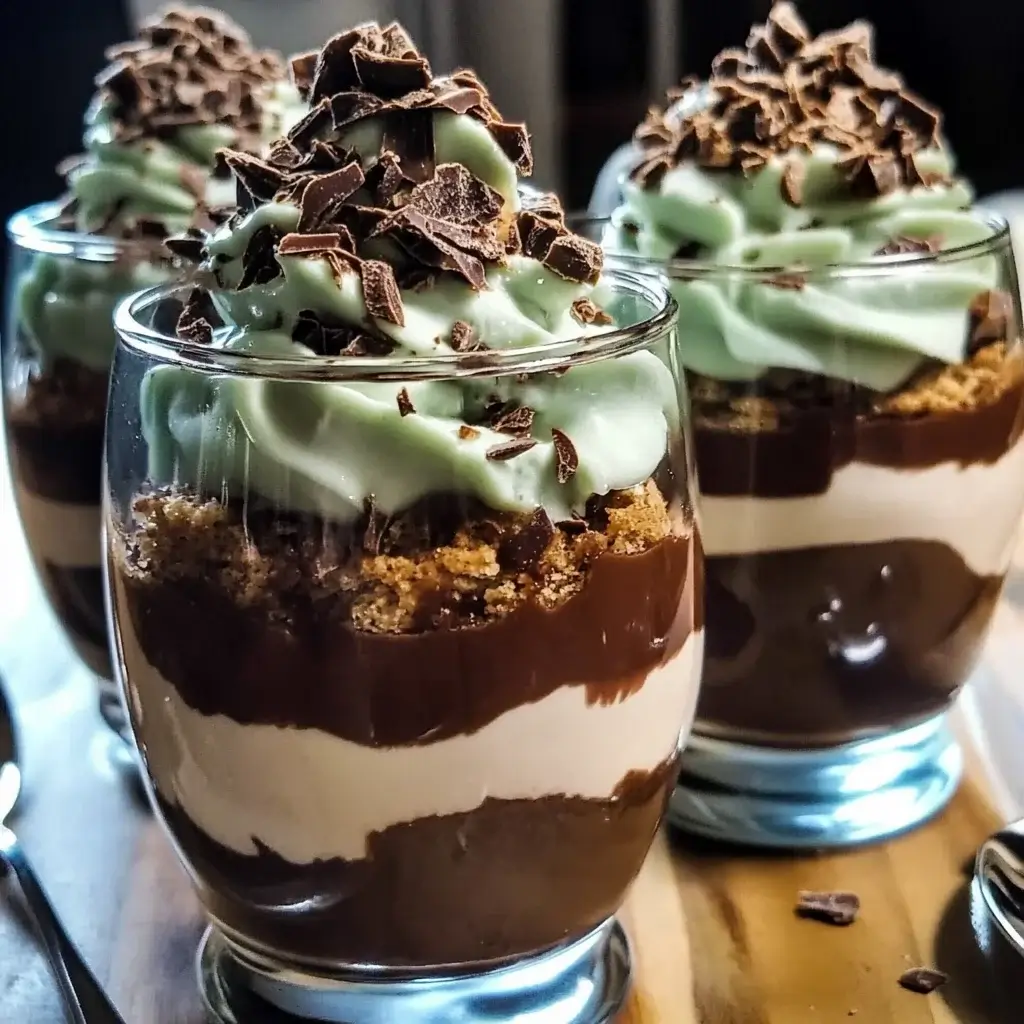
- Assemble Parfaits: Now for the fun part – assembling your Chocolate Pudding Parfaits! Choose your serving glasses or dishes. Spoon a layer of chocolate pudding into the bottom of each glass. Top with a layer of crushed graham crackers or cookies. Then, add a layer of whipped cream or yogurt. Repeat these layers, starting with pudding again, until your glasses are filled to your desired height, ending with a final layer of whipped cream or yogurt.
- Garnish and Chill: Garnish the top of each parfait with chocolate shavings or sprinkles, if desired. For an extra touch, you could also add a fresh berry like a raspberry or strawberry. Chill the parfaits in the refrigerator for at least 30 minutes to allow them to set and the flavors to meld together. Chilling also makes them even more refreshing and enjoyable, especially on a warm day. They can be chilled for up to several hours, making them perfect for making ahead of time.
Nutrition Facts
(per serving, approximate, based on 6 servings)
- Serving Size: 1 parfait
- Calories: Approximately 320-380 kcal (depending on toppings and whipped cream/yogurt choice)
- Total Fat: 15-20g
- Saturated Fat: 9-12g
Please note: Nutrition facts are estimates and can vary based on specific ingredients used and serving sizes. For precise nutritional information, use a nutrition calculator with the specific brands and quantities of ingredients you use.
Preparation Time
- Prep Time: 15 minutes (for measuring ingredients and crushing cookies)
- Cook Time: 5-7 minutes (for making the pudding)
- Cooling Time: 15 minutes (for pudding to cool slightly)
- Assembly Time: 10 minutes (for layering parfaits)
- Chill Time: 30 minutes minimum (for parfaits to set)
- Total Time: Approximately 1 hour (including chilling time)
This Chocolate Pudding Parfait recipe is wonderfully quick and easy, making it perfect for a last-minute dessert craving or a simple treat for any occasion. Most of the time is hands-off, allowing you to prepare other parts of your meal or simply relax while the pudding cools and the parfaits chill.
How to Serve
- Chilled: Chocolate Pudding Parfaits are best served chilled. The cold temperature enhances the creamy texture of the pudding and makes them incredibly refreshing.
- With Fresh Berries: Enhance the flavors and add a touch of freshness by serving with fresh berries. Raspberries, strawberries, blueberries, or even sliced bananas pair beautifully with chocolate.
- With Different Toppings: Get creative with your toppings! Consider adding:
- Chopped nuts (like pecans, walnuts, or almonds) for extra crunch.
- Caramel sauce or chocolate syrup for added sweetness and indulgence.
- Mini chocolate chips or sprinkles for visual appeal.
- Toasted coconut flakes for a tropical twist.
- A dusting of cocoa powder for a sophisticated finish.
- In Individual Glasses or a Large Trifle Bowl: Serve them in individual parfait glasses, dessert cups, or even mason jars for a charming presentation. For a larger gathering, you can also layer the parfaits in a large trifle bowl for a stunning centerpiece dessert.
- For Parties and Gatherings: These parfaits are perfect for potlucks, barbecues, birthday parties, or any casual get-together. They are easy to transport and can be made ahead of time, reducing stress on the day of your event.
- As a Family Dessert: Chocolate Pudding Parfaits are a guaranteed crowd-pleaser for family dinners. They are simple enough to make on a weeknight but special enough for weekend celebrations.
- With Coffee or Tea: Pair your Chocolate Pudding Parfait with a cup of hot coffee or tea for a delightful after-dinner treat. The rich chocolate flavor complements the bitterness of coffee and the warmth of tea.
- As a Customizable Dessert Bar: Set up a parfait bar with bowls of chocolate pudding, crushed cookies, whipped cream, and a variety of toppings. Let your guests build their own personalized Chocolate Pudding Parfaits – it’s a fun and interactive dessert experience!
Additional Tips for Perfect Chocolate Pudding Parfaits
- Use High-Quality Cocoa Powder: The quality of your cocoa powder significantly impacts the flavor of your chocolate pudding. Opt for a good quality unsweetened cocoa powder, preferably Dutch-processed for a smoother, richer chocolate taste.
- Adjust Sweetness to Your Preference: The recipe is designed to be moderately sweet, but you can adjust the amount of sugar to your liking. If you prefer a less sweet dessert, start with slightly less sugar and taste as you go. You can always add more, but you can’t take it away.
- Make the Pudding Ahead of Time: The chocolate pudding can be made up to 2-3 days in advance and stored in the refrigerator. This is a great time-saver if you’re preparing for a party or want to have dessert ready whenever the craving strikes. Just make sure to cover the surface of the pudding with plastic wrap to prevent a skin from forming.
- Experiment with Different Cookie Layers: Don’t limit yourself to just graham crackers! Try using chocolate graham crackers, Oreos (without the cream filling), vanilla wafers, shortbread cookies, gingersnaps, or even crushed brownie brittle for different flavor and texture combinations.
- Vary Your Toppings for Endless Combinations: The topping possibilities are endless! Think beyond whipped cream and sprinkles. Consider adding fresh fruit, chopped nuts, caramel sauce, peanut butter cups, toasted marshmallows, mini pretzels, or even a drizzle of espresso syrup for a mocha twist.
- Try Different Pudding Flavors: While chocolate pudding is classic, you can also experiment with other pudding flavors for your parfaits. Vanilla pudding, butterscotch pudding, or even a layered parfait with both chocolate and vanilla pudding can be delicious variations.
- Make it Vegan or Dairy-Free: Easily adapt this recipe to be vegan or dairy-free by using plant-based milk like almond milk, oat milk, or soy milk in the pudding. Ensure your whipped cream is also dairy-free, using coconut whipped cream or a vegan whipped topping. Check your cookie layers to ensure they are also vegan if needed.
- Get Kids Involved in Assembling: Assembling Chocolate Pudding Parfaits is a fun and easy activity to do with kids. Let them crush the cookies, layer the ingredients in the glasses, and choose their own toppings. It’s a great way to get them involved in the kitchen and enjoy a delicious dessert together.
Frequently Asked Questions (FAQ)
Q1: Can I use instant chocolate pudding mix instead of making homemade pudding?
A1: Yes, you absolutely can! If you’re short on time, using instant chocolate pudding mix is a convenient shortcut. Simply prepare the instant pudding according to package directions and use it to assemble your parfaits. While homemade pudding offers a richer, more nuanced flavor, instant pudding is a perfectly acceptable and quicker alternative for a delicious dessert.
Q2: How can I make these Chocolate Pudding Parfaits vegan?
A2: Making vegan Chocolate Pudding Parfaits is easy! Use plant-based milk like almond milk, oat milk, or soy milk instead of cow’s milk when making the pudding. Ensure your cocoa powder is vegan-friendly (most unsweetened cocoa powders are). For the whipped cream layer, use coconut whipped cream or a store-bought vegan whipped topping. Check the ingredients of your cookies to ensure they are also vegan-friendly; graham crackers can sometimes contain honey.
Q3: Can I make Chocolate Pudding Parfaits ahead of time?
A3: Yes, you can definitely make Chocolate Pudding Parfaits ahead of time. They are actually a great make-ahead dessert! You can assemble the parfaits and store them in the refrigerator for up to 24 hours. However, if you’re using whipped cream, it’s best to add it closer to serving time to prevent it from deflating or becoming watery. The pudding itself can be made up to 2-3 days in advance and stored separately.
Q4: How long do Chocolate Pudding Parfaits last in the refrigerator?
A4: Assembled Chocolate Pudding Parfaits will last in the refrigerator for up to 2-3 days. The pudding will remain fresh, and the cookie layers will soften slightly over time. For the best texture, it’s recommended to enjoy them within the first 24 hours. Make sure to store them covered in the refrigerator to prevent them from drying out or absorbing odors.
Q5: Can I use a different sweetener instead of granulated sugar in the pudding?
A5: Yes, you can substitute granulated sugar with other sweeteners. You can use cane sugar, coconut sugar, or even sugar substitutes like stevia or erythritol. Keep in mind that using liquid sweeteners like honey or maple syrup might slightly alter the texture of the pudding and may require adjusting the liquid content. When using sugar substitutes, follow package directions for equivalent sweetness to granulated sugar.
Q6: Can I use different types of toppings besides chocolate shavings and sprinkles?
A6: Absolutely! Get creative and use any toppings you enjoy. Fresh berries, chopped nuts, caramel sauce, hot fudge sauce, peanut butter cups, mini marshmallows, toasted coconut, crushed candy bars, or even a drizzle of coffee liqueur are all fantastic topping options. The possibilities are truly endless – personalize your parfaits to your taste!
Q7: Can I easily double or triple this recipe for a larger crowd?
A7: Yes, this recipe is very easy to scale up. Simply double or triple all the ingredient quantities proportionally to make a larger batch of Chocolate Pudding Parfaits. You can use a larger saucepan when making a bigger batch of pudding. For a large gathering, consider layering the parfaits in a trifle bowl instead of individual glasses for easier serving.
Q8: Are Chocolate Pudding Parfaits a kid-friendly dessert?
A8: Yes, Chocolate Pudding Parfaits are incredibly kid-friendly! Kids love the creamy chocolate pudding, crunchy cookies, and fun toppings. They are also easy for kids to help assemble, making it a great family activity. You can customize the toppings to appeal to children’s preferences, and they are a guaranteed hit at kids’ parties or family gatherings.
Print
Chocolate Pudding Parfaits
Ingredients
- Whole Milk: The base of our pudding, whole milk provides the richness and creamy texture we desire. You can use 2% milk for a slightly lighter version, but whole milk truly gives the best flavor and consistency.
- Granulated Sugar: Adds the perfect amount of sweetness to balance the cocoa and create a delightful dessert. Feel free to adjust slightly to your preference.
- Unsweetened Cocoa Powder: The star of the show! Use high-quality unsweetened cocoa powder for a deep, intense chocolate flavor. Dutch-processed cocoa will give a smoother, less bitter taste and a darker color.
- Cornstarch: Our thickening agent. Cornstarch is essential for creating that classic pudding texture, ensuring it’s thick and velvety smooth.
- Pinch of Salt: Enhances the flavors of the other ingredients, particularly the chocolate, and balances the sweetness.
- Vanilla Extract: A touch of vanilla extract rounds out the chocolate flavor and adds a warm, aromatic note. Use pure vanilla extract for the best results.
- Semi-Sweet Chocolate Chips (Optional): Adding chocolate chips at the end of cooking intensifies the chocolate flavor and adds little pockets of melty chocolate goodness throughout the pudding.
- Graham Crackers or Chocolate Cookies: For layering in the parfaits, providing a delightful textural contrast to the creamy pudding. You can use regular graham crackers, chocolate graham crackers, Oreos (without cream), or any other crisp cookie you enjoy.
- Whipped Cream or Yogurt: Adds a light and airy layer to the parfaits, contrasting beautifully with the richness of the chocolate pudding and the crunch of the cookies. You can use homemade whipped cream, store-bought whipped topping, or even Greek yogurt for a slightly healthier twist.
- Chocolate Shavings or Sprinkles (Optional): For garnish, adding a final touch of elegance and visual appeal to your parfaits.
Instructions
- Combine Dry Ingredients: In a medium saucepan, whisk together the granulated sugar, unsweetened cocoa powder, cornstarch, and salt. Whisking these dry ingredients together first helps to prevent any lumps from forming when you add the milk. Make sure everything is well combined and the cocoa powder is evenly distributed. This step is crucial for a smooth pudding base.
- Whisk in Milk: Gradually pour in the whole milk, whisking constantly until the mixture is smooth and there are no clumps of cocoa powder or cornstarch remaining. Ensure the milk is fully incorporated into the dry ingredients, creating a homogenous mixture. This gentle whisking process ensures a silky smooth pudding in the end.
- Cook and Thicken: Place the saucepan over medium heat and cook, stirring constantly with a whisk, until the mixture begins to thicken and comes to a gentle simmer. Continue to cook and stir for another 1-2 minutes, allowing the pudding to thicken further. You’ll know it’s ready when it coats the back of a spoon and leaves a clear trail when you run your finger through it. Be patient and keep stirring continuously to prevent scorching on the bottom of the pan. Lower the heat if necessary to maintain a gentle simmer.
- Stir in Vanilla and Chocolate Chips (Optional): Remove the saucepan from the heat and stir in the vanilla extract. If using chocolate chips, stir them in now as well, allowing them to melt into the warm pudding. Stir until the vanilla is fully incorporated and the chocolate chips are melted and evenly distributed throughout the pudding, creating a richer, more decadent flavor.
- Cool Slightly: Let the chocolate pudding cool slightly for about 10-15 minutes before assembling the parfaits. This will allow it to thicken a bit more and prevent it from melting the whipped cream too much when layering. You can also pour the pudding into a bowl and cover the surface directly with plastic wrap to prevent a skin from forming while it cools.
- Crush Cookies: While the pudding is cooling, prepare your cookie layers. If using graham crackers or cookies, crush them into coarse crumbs. You can do this by placing them in a zip-top bag and using a rolling pin or the bottom of a heavy pan to crush them. Don’t crush them too finely; you want some texture in your parfaits.
- Assemble Parfaits: Now for the fun part – assembling your Chocolate Pudding Parfaits! Choose your serving glasses or dishes. Spoon a layer of chocolate pudding into the bottom of each glass. Top with a layer of crushed graham crackers or cookies. Then, add a layer of whipped cream or yogurt. Repeat these layers, starting with pudding again, until your glasses are filled to your desired height, ending with a final layer of whipped cream or yogurt.
- Garnish and Chill: Garnish the top of each parfait with chocolate shavings or sprinkles, if desired. For an extra touch, you could also add a fresh berry like a raspberry or strawberry. Chill the parfaits in the refrigerator for at least 30 minutes to allow them to set and the flavors to meld together. Chilling also makes them even more refreshing and enjoyable, especially on a warm day. They can be chilled for up to several hours, making them perfect for making ahead of time.
Nutrition
- Serving Size: one normal portion
- Calories: 380
- Fat: 20g
- Saturated Fat: 12g


