")


I still remember the first time I made these No-Bake Cheesecake Jars. It was for a hectic family get-together, one of those summer afternoons where the thought of turning on the oven felt like a personal affront. I needed something impressive but ridiculously easy, a dessert that could be prepped ahead and wouldn’t add to the kitchen chaos. Skeptical but hopeful, I whipped up a batch of these little jars of joy. The reaction? Pure delight. My kids, usually picky, devoured theirs, tiny spoons scraping the bottoms. My partner, a self-proclaimed cheesecake connoisseur, declared them “dangerously good.” Even my notoriously hard-to-please aunt asked for the recipe! Since then, these No-Bake Cheesecake Jars have become my go-to dessert solution. They are incredibly versatile, require minimal effort, and deliver that perfect balance of creamy, tangy cheesecake filling and buttery, crunchy crust, all conveniently portioned in charming little jars. They truly are a lifesaver for busy hosts, a treat for quiet nights in, and guaranteed crowd-pleasers every single time. If you’re looking for a simple yet elegant dessert that tastes like you spent hours (when you absolutely didn’t), this recipe is your new best friend.
Ingredients
Here’s what you’ll need to create these delightful individual dessert jars:
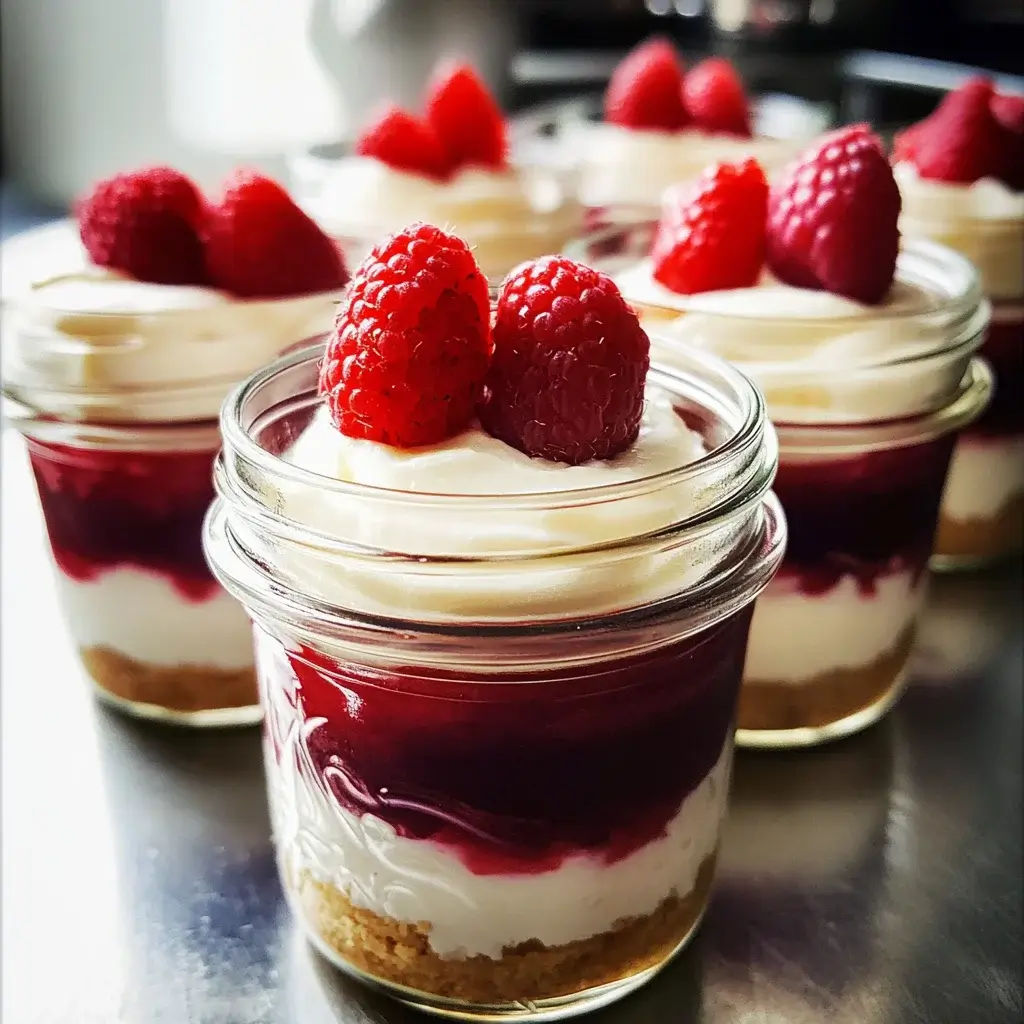
- Graham Crackers: 1 ½ cups finely crushed (about 10-12 full sheets) – Forms the classic, buttery base.
- Unsalted Butter: 6 tablespoons (85g), melted – Binds the graham cracker crumbs together for the perfect crust.
- Granulated Sugar: 2 tablespoons – Adds a touch of sweetness to the crust.
- Cream Cheese: 16 ounces (452g), full-fat, softened to room temperature – The heart of the cheesecake; ensures a rich, creamy texture. Crucial that it’s properly softened!
- Powdered Sugar: 1 cup (120g), sifted – Sweetens the filling smoothly without grittiness.
- Heavy Cream: 1 cup (240ml), cold – Whips up to give the cheesecake filling its light, airy texture.
- Pure Vanilla Extract: 1 teaspoon – Enhances the overall flavor profile.
- Lemon Juice: 1 tablespoon, fresh squeezed (optional but recommended) – Adds a subtle tanginess that balances the richness and brightens the flavour.
- Pinch of Salt: Just a tiny pinch – Balances the sweetness and enhances the other flavours.
Instructions
Follow these simple steps to assemble your delicious No-Bake Cheesecake Jars:
Prepare the Graham Cracker Crust:
- Crush the Crackers: Place graham crackers in a food processor and pulse until finely ground. Alternatively, place them in a zip-top bag and crush them using a rolling pin or heavy can until you achieve fine crumbs.
- Combine Crust Ingredients: In a medium bowl, combine the finely crushed graham cracker crumbs, melted butter, and granulated sugar. Stir with a fork until the crumbs are evenly moistened and resemble wet sand.
- Press into Jars: Spoon about 2-3 tablespoons of the graham cracker mixture into the bottom of each serving jar (this recipe typically makes 6-8 small jars, depending on size – 4-6oz jars work well). Use the back of a spoon or a small tamper (like a shot glass bottom) to gently press the crumbs down into an even layer.
- Chill the Crust: Place the jars in the refrigerator to chill while you prepare the cheesecake filling. This helps the crust set slightly.
Prepare the No-Bake Cheesecake Filling:
- Beat the Cream Cheese: In a large bowl, using an electric hand mixer or a stand mixer fitted with the paddle attachment, beat the softened cream cheese on medium speed until completely smooth and free of lumps. This step is crucial for a non-lumpy filling, so scrape down the sides of the bowl as needed.
- Add Sweeteners and Flavor: Add the sifted powdered sugar, vanilla extract, fresh lemon juice (if using), and pinch of salt to the smooth cream cheese. Beat on low speed initially to incorporate the sugar, then increase to medium speed and beat until well combined and smooth, scraping the bowl again.
- Whip the Heavy Cream: In a separate, clean, chilled bowl, whip the cold heavy cream using an electric mixer (with clean beaters) on medium-high speed until stiff peaks form. Be careful not to overwhip into butter. Stiff peaks mean that when you lift the beaters out, the cream holds its shape firmly.
- Fold Gently: Gently fold the whipped cream into the cream cheese mixture in two or three additions using a rubber spatula. Fold just until combined – you want to maintain the airy texture from the whipped cream. Overmixing will deflate the filling. The mixture should be thick, creamy, and light.
Assemble the Cheesecake Jars:
- Fill the Jars: Remove the jars with the chilled crusts from the refrigerator. Carefully spoon or pipe the cheesecake filling evenly over the graham cracker crust layer in each jar. You can use a piping bag (with or without a tip) for a neater presentation, or simply use two spoons. Smooth the tops gently with the back of a spoon or a small offset spatula.
- Chill Thoroughly: Cover the jars loosely with plastic wrap or their lids. Refrigerate for at least 4-6 hours, or preferably overnight. This chilling time is essential for the cheesecake filling to set properly and for the flavors to meld.
Nutrition Facts
(Approximate values per serving, assuming recipe makes 6 servings. Actual values may vary based on specific ingredients and jar sizes used.)
- Servings: 6 Jars
- Calories: Approximately 650-750 kcal per jar – A decadent treat, reflecting the richness of cream cheese and butter.
- Fat: Approximately 50-60g – Primarily from cream cheese, butter, and heavy cream, contributing to the creamy texture.
- Carbohydrates: Approximately 45-55g – Mainly from sugars (powdered and granulated) and graham crackers.
Disclaimer: These are estimates. For precise nutritional information, calculate based on the exact brands and quantities of ingredients used.
Preparation Time
- Active Preparation Time: Approximately 20-25 minutes (Crushing crackers, mixing crust, beating filling, assembling jars).
- Chilling Time: Minimum 4-6 hours, preferably overnight (Essential for setting the filling).
- Total Time: Approximately 4 hours 20 minutes to Overnight.
This recipe is quick to assemble, but requires significant hands-off chilling time for the best texture and flavour development. Plan accordingly!
How to Serve
These No-Bake Cheesecake Jars are delightful on their own, but toppings and presentation elevate them further! Here are some ideas:
- Classic & Fruity:
- Top with fresh berries (strawberries, blueberries, raspberries, blackberries) just before serving.
- Spoon over a simple berry coulis or fruit compote (strawberry, mixed berry, cherry, or peach work wonderfully).
- Add a dollop of fresh whipped cream and a mint sprig for colour.
- Decadent & Rich:
- Drizzle generously with salted caramel sauce or warm chocolate ganache.
- Sprinkle with chocolate shavings, mini chocolate chips, or chopped toffee bits.
- Add a layer of crushed Oreos or chopped nuts (pecans, walnuts) on top or between layers.
- Citrus Burst:
- Garnish with lemon or lime zest and a small dollop of lemon curd.
- A candied citrus peel adds an elegant touch.
- Presentation Flair:
- Serve chilled directly from the refrigerator.
- Tie a small ribbon or piece of twine around the neck of the jar for parties or gifting.
- Provide small dessert spoons or forks alongside each jar.
- Arrange jars on a platter or tiered stand for an impressive dessert display.
- Seasonal Touches:
- Use seasonal fruits: peaches in summer, spiced apple compote in fall, cranberry sauce around the holidays.
- Add a sprinkle of cinnamon or pumpkin spice to the crust or filling for an autumnal twist.
Additional Tips
Maximize your No-Bake Cheesecake Jar success with these helpful tips:
- Room Temperature Cream Cheese is Non-Negotiable: Seriously, let the cream cheese sit out for at least 1-2 hours before starting. Cold cream cheese = lumpy cheesecake. If you’re short on time, you can unwrap the blocks, cut them into smaller cubes, and spread them on a plate to soften faster (about 30 mins). Microwaving is risky as it can melt it unevenly.
- Use Full-Fat Cream Cheese: For the richest flavour and creamiest, most stable texture, stick with full-fat block-style cream cheese. Reduced-fat (Neufchâtel) can sometimes result in a slightly looser filling, and cream cheese spread in a tub has extra air and stabilizers that aren’t ideal for this recipe’s structure.
- Don’t Overmix After Adding Whipped Cream: Fold the whipped cream in gently and just until combined. Overmixing will deflate the air you incorporated, leading to a denser, less fluffy cheesecake filling. Stop folding as soon as you no longer see streaks of white whipped cream.
- Chill Time is Key: Don’t rush the chilling process! The 4-6 hours (or ideally, overnight) in the refrigerator are crucial for the filling to fully set and achieve that perfect cheesecake texture. It also allows the flavours to meld beautifully.
- Crust Variations: Feel free to swap the graham crackers! Try Oreo cookies (remove filling for less sweetness, or keep it for extra richness), Biscoff cookies, shortbread, vanilla wafers, or even gingersnaps for different flavour profiles. Adjust butter slightly if needed based on cookie moisture. You can also add a tablespoon of cocoa powder to the graham cracker crust for a chocolate base.
- Flavor Your Filling: Get creative! Add 1/4 cup of cocoa powder (sifted with the powdered sugar) for chocolate cheesecake. Fold in 1/2 cup of fruit puree (like strawberry or raspberry, slightly reduced on the stovetop to thicken) for a fruity filling. Add instant espresso powder dissolved in the vanilla for a coffee kick. Use different extracts like almond or coconut. Add citrus zest (orange, lime) along with the lemon juice.
- Perfect Piping: For a professional look, use a piping bag (a large zip-top bag with a corner snipped off works too) to fill the jars. A large star tip or round tip creates pretty swirls. This method avoids smudging the filling on the sides of the jar.
- Make-Ahead Strategy: These are perfect make-ahead desserts. You can prepare them completely (without toppings) up to 2-3 days in advance. Keep them covered tightly in the refrigerator. Add fresh toppings just before serving for the best appearance and texture. The crust might soften slightly over time, but they will still be delicious.
FAQ Section (Frequently Asked Questions)
Q1: Can I make these No-Bake Cheesecake Jars ahead of time?
A1: Absolutely! These are ideal make-ahead desserts. You can assemble them completely (crust and filling) and store them covered in the refrigerator for up to 3 days. For the best presentation and texture, add any fresh fruit, whipped cream, or delicate toppings just before serving.
Q2: My cheesecake filling seems a bit runny. What went wrong?
A2: There are a few common reasons for a runny filling:
- Cream cheese wasn’t soft enough: If it was still cold, it wouldn’t beat smoothly and incorporate properly.
- Heavy cream wasn’t whipped to stiff peaks: Under-whipped cream won’t provide enough structure.
- Overmixing after adding whipped cream: This deflates the mixture.
- Not enough chilling time: The cheesecake needs adequate time in the fridge to set fully. Ensure at least 4-6 hours.
- Using low-fat ingredients: Full-fat cream cheese and heavy cream provide the necessary fat content for setting.
Q3: Can I make this recipe gluten-free?
A3: Yes, easily! Simply substitute the graham crackers with your favorite gluten-free cookies that crumble well. Gluten-free graham crackers, vanilla wafers, or shortbread-style cookies work great. Ensure all other ingredients (like vanilla extract) are certified gluten-free if needed for severe allergies.
Q4: Can I use low-fat cream cheese or a sugar substitute?
A4: You can try, but expect differences. Low-fat cream cheese (Neufchâtel) can sometimes result in a softer, less firm set. Whipped cream cheese spread is not recommended due to added air and stabilizers. Using sugar substitutes (like erythritol blends suitable for confectioners’ sugar replacement) can work, but may slightly alter the taste and potentially the texture. Adjust quantities according to the substitute’s sweetness level and be aware it might not dissolve as smoothly. Always use cold heavy cream for whipping.
Q5: I don’t have small jars. What else can I use?
A5: No problem! You can assemble this recipe in various individual serving containers. Try small glasses, ramekins, small bowls, or even muffin liners placed in a muffin tin (though removing them might be tricky). You could also make one larger no-bake cheesecake in a small springform pan or pie dish, following the same instructions and adjusting chilling time if needed for a larger volume.
Q6: Can I freeze these No-Bake Cheesecake Jars?
A6: While technically possible, freezing can sometimes alter the texture of no-bake cheesecake, potentially making the filling slightly grainy or watery upon thawing due to the high dairy content. The crust may also become soggy. If you choose to freeze, wrap the jars tightly without toppings. Thaw overnight in the refrigerator. They are best enjoyed fresh or refrigerated.
Q7: How can I easily fill the jars without making a mess?
A7: The cleanest method is using a piping bag. Fit it with a large round or star tip, or simply snip off the end (about 1/2 inch). Spoon the cheesecake filling into the bag, twist the top closed, and pipe the filling neatly onto the crust layer. This gives you more control and prevents smearing on the glass. Alternatively, use two spoons – one to scoop, one to push the filling off into the jar.
Q8: What makes No-Bake Cheesecake different from baked cheesecake?
A8: The main difference is the cooking method and ingredients used for setting. Baked cheesecakes rely on eggs and the heat of the oven to set into a dense, rich, custard-like texture. No-bake cheesecakes typically don’t contain eggs and rely on the chilling of fats (cream cheese, butter, whipped cream) and sometimes gelatin (though not in this recipe) to firm up. This results in a lighter, creamier, and often quicker-to-prepare dessert that doesn’t require turning on the oven.

No-Bake Cheesecake Jars
Ingredients
Here’s what you’ll need to create these delightful individual dessert jars:
- Graham Crackers: 1 ½ cups finely crushed (about 10-12 full sheets) – Forms the classic, buttery base.
- Unsalted Butter: 6 tablespoons (85g), melted – Binds the graham cracker crumbs together for the perfect crust.
- Granulated Sugar: 2 tablespoons – Adds a touch of sweetness to the crust.
- Cream Cheese: 16 ounces (452g), full-fat, softened to room temperature – The heart of the cheesecake; ensures a rich, creamy texture. Crucial that it’s properly softened!
- Powdered Sugar: 1 cup (120g), sifted – Sweetens the filling smoothly without grittiness.
- Heavy Cream: 1 cup (240ml), cold – Whips up to give the cheesecake filling its light, airy texture.
- Pure Vanilla Extract: 1 teaspoon – Enhances the overall flavor profile.
- Lemon Juice: 1 tablespoon, fresh squeezed (optional but recommended) – Adds a subtle tanginess that balances the richness and brightens the flavour.
- Pinch of Salt: Just a tiny pinch – Balances the sweetness and enhances the other flavours.
Instructions
Follow these simple steps to assemble your delicious No-Bake Cheesecake Jars:
Prepare the Graham Cracker Crust:
- Crush the Crackers: Place graham crackers in a food processor and pulse until finely ground. Alternatively, place them in a zip-top bag and crush them using a rolling pin or heavy can until you achieve fine crumbs.
- Combine Crust Ingredients: In a medium bowl, combine the finely crushed graham cracker crumbs, melted butter, and granulated sugar. Stir with a fork until the crumbs are evenly moistened and resemble wet sand.
- Press into Jars: Spoon about 2-3 tablespoons of the graham cracker mixture into the bottom of each serving jar (this recipe typically makes 6-8 small jars, depending on size – 4-6oz jars work well). Use the back of a spoon or a small tamper (like a shot glass bottom) to gently press the crumbs down into an even layer.
- Chill the Crust: Place the jars in the refrigerator to chill while you prepare the cheesecake filling. This helps the crust set slightly.
Prepare the No-Bake Cheesecake Filling:
- Beat the Cream Cheese: In a large bowl, using an electric hand mixer or a stand mixer fitted with the paddle attachment, beat the softened cream cheese on medium speed until completely smooth and free of lumps. This step is crucial for a non-lumpy filling, so scrape down the sides of the bowl as needed.
- Add Sweeteners and Flavor: Add the sifted powdered sugar, vanilla extract, fresh lemon juice (if using), and pinch of salt to the smooth cream cheese. Beat on low speed initially to incorporate the sugar, then increase to medium speed and beat until well combined and smooth, scraping the bowl again.
- Whip the Heavy Cream: In a separate, clean, chilled bowl, whip the cold heavy cream using an electric mixer (with clean beaters) on medium-high speed until stiff peaks form. Be careful not to overwhip into butter. Stiff peaks mean that when you lift the beaters out, the cream holds its shape firmly.
- Fold Gently: Gently fold the whipped cream into the cream cheese mixture in two or three additions using a rubber spatula. Fold just until combined – you want to maintain the airy texture from the whipped cream. Overmixing will deflate the filling. The mixture should be thick, creamy, and light.
Assemble the Cheesecake Jars:
- Fill the Jars: Remove the jars with the chilled crusts from the refrigerator. Carefully spoon or pipe the cheesecake filling evenly over the graham cracker crust layer in each jar. You can use a piping bag (with or without a tip) for a neater presentation, or simply use two spoons. Smooth the tops gently with the back of a spoon or a small offset spatula.
- Chill Thoroughly: Cover the jars loosely with plastic wrap or their lids. Refrigerate for at least 4-6 hours, or preferably overnight. This chilling time is essential for the cheesecake filling to set properly and for the flavors to meld.
Nutrition
- Serving Size: one normal portion
- Calories: 750
- Fat: 60g
- Carbohydrates: 55g


