")


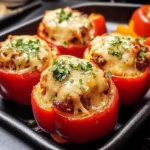
Honestly, finding appetizers that please everyone in my family and feel somewhat healthy can be a challenge. Between picky eaters and my own desire for something more exciting than standard chips and dip, party planning often involved a bit of head-scratching. That’s until I stumbled upon the idea of transforming classic stuffed peppers into bite-sized wonders. The first time I made these Stuffed Bell Pepper Bites for a Sunday get-together, I was genuinely nervous. Would the kids turn up their noses at the peppers? Would the adults find them too fussy? To my absolute delight, they were a runaway hit! The colourful mini peppers looked incredibly inviting on the platter, and the savory, cheesy filling packed inside was irresistible. My kids, who usually avoid bell peppers, devoured them, calling them “little pepper boats.” My husband loved the familiar comfort-food flavor packed into an easy-to-eat bite, and our friends were asking for the recipe before the evening was over. They’ve since become a staple for game days, potlucks, and even as a fun, light dinner component. They are relatively easy to prepare, look fantastic, and deliver big flavor in a small package – a true win-win in my recipe book.
Ingredients for Delicious Stuffed Bell Pepper Bites
Here’s what you’ll need to create these crowd-pleasing bites. Using fresh ingredients will yield the best flavor.
- Mini Sweet Bell Peppers: 1 lb (about 10-12 peppers) – These provide the colourful, naturally sweet, and perfectly sized vessels for our filling. Look for a mix of red, orange, and yellow for visual appeal.
- Lean Ground Beef (or Turkey/Chicken): 1 lb – The savory base of our filling. Using lean meat (90/10 or leaner) reduces excess grease.
- Olive Oil: 1 tablespoon – Used for sautéing the aromatics and browning the meat, adding a touch of fruity flavor.
- Yellow Onion: 1 medium, finely diced – Provides a foundational aromatic sweetness to the filling. Fine dicing ensures it integrates well.
- Garlic: 3 cloves, minced – Adds that essential pungent kick that complements the meat and spices. Fresh garlic is recommended.
- Cooked Rice: 1 cup – Adds substance and texture to the filling, helping to bind it together. Leftover white, brown, or even quinoa works well.
- Diced Tomatoes: 1 (14.5 oz) can, undrained – Adds moisture, acidity, and tomato flavor that’s classic in stuffed peppers. Undrained provides necessary liquid.
- Tomato Paste: 1 tablespoon – Concentrates the tomato flavor for a richer filling.
- Worcestershire Sauce: 1 teaspoon – Adds a complex umami depth to the meat mixture.
- Italian Seasoning: 1 ½ teaspoons – A blend of dried herbs like oregano, basil, and thyme that provides a balanced, savory flavor profile.
- Salt: ¾ teaspoon (or to taste) – Enhances all the other flavors. Adjust based on your preference and the saltiness of other ingredients.
- Black Pepper: ½ teaspoon (or to taste) – Adds a gentle warmth and spice. Freshly ground is best.
- Shredded Cheese: 1 ½ cups, divided – Cheddar, Monterey Jack, Mozzarella, or a blend works beautifully. Divided use ensures cheesy filling and a golden, bubbly topping.
- Fresh Parsley: 2 tablespoons, chopped (optional garnish) – Adds a touch of freshness and color right before serving.
Step-by-Step Instructions for Perfect Bites
Follow these simple steps to assemble and bake your Stuffed Bell Pepper Bites. Precision in preparation leads to delicious results.
- Preheat Oven & Prep Peppers: Preheat your oven to 375°F (190°C). Line a large baking sheet with parchment paper for easy cleanup. Wash the mini bell peppers thoroughly. Slice each pepper in half lengthwise, from stem to tip. Carefully remove the seeds and membranes using a small spoon or paring knife. Arrange the pepper halves, cut-side up, on the prepared baking sheet. Getting the peppers ready first streamlines the process.
- Sauté Aromatics: Heat the olive oil in a large skillet or Dutch oven over medium heat. Add the finely diced onion and sauté for 4-5 minutes, or until softened and translucent. Stir in the minced garlic and cook for another minute until fragrant. Be careful not to burn the garlic. This step builds the flavor base.
- Brown the Meat: Add the lean ground beef (or your chosen ground meat) to the skillet. Break it apart with a spoon and cook, stirring occasionally, until browned and cooked through, about 7-10 minutes. Drain off any excess grease from the skillet. Proper browning develops a richer meat flavor.
- Combine Filling Ingredients: Stir the cooked rice, undrained diced tomatoes, tomato paste, Worcestershire sauce, Italian seasoning, ¾ teaspoon salt, and ½ teaspoon black pepper into the skillet with the meat mixture. Mix everything together well.
- Simmer Filling: Bring the mixture to a gentle simmer. Reduce the heat to low, cover the skillet, and let it simmer for 5-10 minutes. This allows the flavors to meld together beautifully and ensures the rice absorbs some moisture. Taste and adjust seasoning if needed (more salt, pepper, or Italian seasoning).
- Add Cheese to Filling: Remove the skillet from the heat. Stir in 1 cup of the shredded cheese until it’s melted and well combined with the meat and rice mixture. This makes the filling extra creamy and delicious.
- Stuff the Peppers: Carefully spoon the meat and rice mixture into each prepared mini bell pepper half. Fill them generously, mounding the filling slightly. Ensure all pepper halves are filled evenly. A small spoon works best for this task.
- Top with Cheese: Sprinkle the remaining ½ cup of shredded cheese evenly over the tops of the stuffed pepper halves. This creates that irresistible golden, bubbly crust during baking.
- Bake: Place the baking sheet with the stuffed peppers into the preheated oven. Bake for 20-25 minutes, or until the peppers are tender-crisp (they should still have a slight bite) and the cheese topping is melted, bubbly, and lightly golden brown. Cooking time may vary slightly depending on the size of your peppers and your oven.
- Rest and Garnish: Once baked, carefully remove the baking sheet from the oven. Let the Stuffed Bell Pepper Bites rest for 5-10 minutes before serving. This allows the filling to set slightly and prevents burning mouths! If desired, garnish with freshly chopped parsley just before serving for a pop of color and freshness.
Nutrition Facts: A Healthy Glance
While specific values depend on exact ingredients used, here’s an approximate nutritional overview per serving (assuming the recipe makes about 6 servings, ~3-4 bites per serving):
- Servings: Approximately 6
- Calories per Serving: Roughly 300-350 kcal – A moderate calorie count, making these suitable as a hearty appetizer or a light meal component.
- Protein: Approximately 20-25g – High in protein primarily from the ground meat and cheese, contributing to satiety and muscle maintenance.
- Carbohydrates: Approximately 15-20g – Primarily from the rice and the natural sugars in the bell peppers and tomatoes. Using brown rice can increase fiber content.
- Fat: Approximately 15-20g (Saturated Fat ~7-10g) – Comes from the meat, cheese, and olive oil. Using leaner meat and reduced-fat cheese can lower this value.
- Fiber: Approximately 3-5g – Bell peppers, tomatoes, and rice (especially brown rice) contribute dietary fiber, important for digestion.
(Disclaimer: These are estimates. Actual nutrition information will vary based on specific ingredients, brands, and preparation methods used.)
Preparation Time Breakdown
Understanding the time commitment helps in planning:
- Preparation Time: 20-25 minutes (Washing and prepping peppers, chopping onion/garlic, measuring ingredients).
- Cooking Time: 35-45 minutes (Sautéing, simmering filling, baking).
- Total Time: Approximately 55-70 minutes from start to finish, plus resting time. Active hands-on time is roughly 30-35 minutes.
How to Serve Your Stuffed Bell Pepper Bites
These versatile bites can be served in various ways. Here are some ideas:
- As a Party Appetizer:
- Arrange them attractively on a large platter.
- Garnish generously with fresh parsley or chives.
- Provide small plates and napkins for easy handling.
- Consider serving alongside other finger foods like Caprese skewers, mini quiches, or shrimp cocktail.
- For Game Day:
- Serve warm directly from the baking sheet (placed on a trivet) for a rustic feel.
- Offer dipping sauces on the side – ranch dressing, sour cream, a spicy aioli, or even guacamole can be delicious complements.
- As a Light Lunch or Dinner:
- Serve 4-6 bites per person.
- Pair with a simple side salad dressed with a light vinaigrette.
- Accompany with a cup of soup (tomato or vegetable soup works well).
- Serve alongside crusty bread for soaking up any deliciousness.
- Included in a Buffet Spread:
- Place them alongside main dishes or other substantial sides.
- Ensure you have tongs or a small spatula for easy serving.
- Keep them warm in a chafing dish on a low setting if serving over an extended period.
- With Creative Dips:
- Plain Greek Yogurt or Sour Cream: Cool and tangy contrast.
- Spicy Ranch Dip: Adds a creamy kick.
- Marinara Sauce: For dipping, enhancing the classic Italian flavors.
- Salsa Verde: A zesty, herby option.
Additional Tips for Recipe Success
Elevate your Stuffed Bell Pepper Bites with these handy tips:
- Choose Peppers Wisely: Look for mini sweet peppers that are relatively uniform in size and shape, and that can sit flat once halved. This ensures even cooking and stable “boats” for the filling. A mix of colors (red, yellow, orange) makes for a beautiful presentation.
- Fine Dicing is Key: Ensure your onion (and any other vegetables you might add, like celery or mushrooms) is finely diced. This helps the flavors meld seamlessly into the filling and ensures a pleasant texture without large chunks.
- Don’t Overcook the Peppers: Aim for tender-crisp peppers, not mushy ones. They should hold their shape and still have a slight bite. Baking them for 20-25 minutes is usually sufficient. If you prefer softer peppers, you can blanch them in boiling water for 2-3 minutes before stuffing.
- Make-Ahead Magic: You can prepare the filling a day or two in advance and store it in an airtight container in the refrigerator. You can also stuff the peppers ahead of time (up to a day before), cover tightly, and refrigerate. Just add about 5-10 minutes to the baking time if baking straight from the fridge.
- Customize the Filling: Feel free to get creative! Swap ground beef for ground turkey, chicken, sausage (spicy or sweet Italian), or even plant-based crumbles for a vegetarian option. Add other finely chopped veggies like mushrooms, zucchini, or spinach. Use different grains like quinoa or farro instead of rice.
- Spice It Up (or Down): Adjust the seasoning to your liking. Add a pinch of red pepper flakes for heat, smoked paprika for smokiness, or cumin and chili powder for a Tex-Mex twist. If you prefer milder flavors, reduce the garlic or omit the black pepper.
- Cheese Choices Matter: While cheddar or Monterey Jack are great, experiment with other cheeses. Pepper Jack adds spice, Gruyère offers nutty depth, Fontina melts beautifully, and a sprinkle of Parmesan on top adds a salty kick. Using a blend often yields the best results.
- Reheating Gracefully: Leftover bites reheat well. Place them on a baking sheet and warm in a 350°F (175°C) oven for 10-15 minutes, or until heated through. Microwaving works but can make the peppers slightly softer; heat in short bursts to avoid overcooking. You can also reheat them effectively in an air fryer for a few minutes.
Frequently Asked Questions (FAQ)
Here are answers to common questions about making Stuffed Bell Pepper Bites:
- Q: Can I make these vegetarian or vegan?
- A: Absolutely! For vegetarian, substitute the ground meat with plant-based ground crumbles, lentils (cooked), finely chopped mushrooms, or a mixture of black beans and corn. Ensure your Worcestershire sauce is vegetarian (some contain anchovies). For vegan, use a plant-based meat substitute, omit the cheese or use a vegan shredded cheese alternative, and ensure your Worcestershire sauce is vegan.
- Q: Are Stuffed Bell Pepper Bites gluten-free?
- A: Yes, this recipe is naturally gluten-free as long as you ensure your Worcestershire sauce is certified gluten-free (some brands contain malt vinegar derived from barley). All other core ingredients (peppers, meat, rice, tomatoes, cheese, spices) are typically gluten-free, but always double-check labels if cross-contamination is a concern.
- Q: Can I use regular bell peppers instead of mini ones?
- A: Yes, you can adapt this recipe for regular bell peppers. Cut standard bell peppers in half lengthwise (or cut off the tops and core them). The filling amount should be sufficient for about 3-4 large bell peppers. You will need to increase the baking time significantly, likely to 40-50 minutes or longer, until the larger peppers are tender. This version is less of an appetizer and more of a main course.
- Q: My filling seems too wet/too dry. How can I fix it?
- A: If the filling seems too wet after simmering, you can let it simmer uncovered for a few extra minutes to allow excess moisture to evaporate. If it seems too dry, add a splash of tomato sauce, beef broth, or even water until it reaches your desired consistency. Remember the cheese will add some moisture and binding when stirred in.
- Q: How do I store leftover Stuffed Bell Pepper Bites?
- A: Let the bites cool completely. Store them in an airtight container in the refrigerator for up to 3-4 days. See the reheating tips above for the best way to warm them up.
- Q: Can I freeze Stuffed Bell Pepper Bites?
- A: Yes, you can freeze them, although the texture of the peppers might soften slightly upon thawing and reheating. To freeze, let the baked bites cool completely. Place them on a baking sheet in a single layer and freeze until solid (flash freezing). Then, transfer them to a freezer-safe bag or container. They can be frozen for up to 2-3 months. Reheat from frozen in a 350°F (175°C) oven until heated through (usually 20-30 minutes), or thaw in the fridge overnight before reheating.
- Q: What kind of rice is best? Can I use cauliflower rice for a low-carb version?
- A: Cooked white rice or brown rice works perfectly. Leftover rice is ideal! You can also use quinoa or farro. For a low-carb/keto version, substitute the cooked rice with an equal amount of cauliflower rice. Sauté the cauliflower rice briefly with the onions and garlic before adding the meat, or stir it in raw with the tomatoes – it will cook during the simmering and baking stages. You may need less liquid if using cauliflower rice.
- Q: My mini peppers are tipping over on the baking sheet. Any suggestions?
- A: Try to choose peppers with flatter bottoms when purchasing. If they still wobble, you can sometimes trim a tiny sliver off the bottom (being careful not to cut through) to create a flat base. Alternatively, you can nestle them close together on the baking sheet so they support each other, or bake them in a muffin tin (one pepper half per cup) to keep them upright.
Stuffed Bell Pepper Bites
Ingredients
Here’s what you’ll need to create these crowd-pleasing bites. Using fresh ingredients will yield the best flavor.
- Mini Sweet Bell Peppers: 1 lb (about 10-12 peppers) – These provide the colourful, naturally sweet, and perfectly sized vessels for our filling. Look for a mix of red, orange, and yellow for visual appeal.
- Lean Ground Beef (or Turkey/Chicken): 1 lb – The savory base of our filling. Using lean meat (90/10 or leaner) reduces excess grease.
- Olive Oil: 1 tablespoon – Used for sautéing the aromatics and browning the meat, adding a touch of fruity flavor.
- Yellow Onion: 1 medium, finely diced – Provides a foundational aromatic sweetness to the filling. Fine dicing ensures it integrates well.
- Garlic: 3 cloves, minced – Adds that essential pungent kick that complements the meat and spices. Fresh garlic is recommended.
- Cooked Rice: 1 cup – Adds substance and texture to the filling, helping to bind it together. Leftover white, brown, or even quinoa works well.
- Diced Tomatoes: 1 (14.5 oz) can, undrained – Adds moisture, acidity, and tomato flavor that’s classic in stuffed peppers. Undrained provides necessary liquid.
- Tomato Paste: 1 tablespoon – Concentrates the tomato flavor for a richer filling.
- Worcestershire Sauce: 1 teaspoon – Adds a complex umami depth to the meat mixture.
- Italian Seasoning: 1 ½ teaspoons – A blend of dried herbs like oregano, basil, and thyme that provides a balanced, savory flavor profile.
- Salt: ¾ teaspoon (or to taste) – Enhances all the other flavors. Adjust based on your preference and the saltiness of other ingredients.
- Black Pepper: ½ teaspoon (or to taste) – Adds a gentle warmth and spice. Freshly ground is best.
- Shredded Cheese: 1 ½ cups, divided – Cheddar, Monterey Jack, Mozzarella, or a blend works beautifully. Divided use ensures cheesy filling and a golden, bubbly topping.
- Fresh Parsley: 2 tablespoons, chopped (optional garnish) – Adds a touch of freshness and color right before serving.
Instructions
Follow these simple steps to assemble and bake your Stuffed Bell Pepper Bites. Precision in preparation leads to delicious results.
- Preheat Oven & Prep Peppers: Preheat your oven to 375°F (190°C). Line a large baking sheet with parchment paper for easy cleanup. Wash the mini bell peppers thoroughly. Slice each pepper in half lengthwise, from stem to tip. Carefully remove the seeds and membranes using a small spoon or paring knife. Arrange the pepper halves, cut-side up, on the prepared baking sheet. Getting the peppers ready first streamlines the process.
- Sauté Aromatics: Heat the olive oil in a large skillet or Dutch oven over medium heat. Add the finely diced onion and sauté for 4-5 minutes, or until softened and translucent. Stir in the minced garlic and cook for another minute until fragrant. Be careful not to burn the garlic. This step builds the flavor base.
- Brown the Meat: Add the lean ground beef (or your chosen ground meat) to the skillet. Break it apart with a spoon and cook, stirring occasionally, until browned and cooked through, about 7-10 minutes. Drain off any excess grease from the skillet. Proper browning develops a richer meat flavor.
- Combine Filling Ingredients: Stir the cooked rice, undrained diced tomatoes, tomato paste, Worcestershire sauce, Italian seasoning, ¾ teaspoon salt, and ½ teaspoon black pepper into the skillet with the meat mixture. Mix everything together well.
- Simmer Filling: Bring the mixture to a gentle simmer. Reduce the heat to low, cover the skillet, and let it simmer for 5-10 minutes. This allows the flavors to meld together beautifully and ensures the rice absorbs some moisture. Taste and adjust seasoning if needed (more salt, pepper, or Italian seasoning).
- Add Cheese to Filling: Remove the skillet from the heat. Stir in 1 cup of the shredded cheese until it’s melted and well combined with the meat and rice mixture. This makes the filling extra creamy and delicious.
- Stuff the Peppers: Carefully spoon the meat and rice mixture into each prepared mini bell pepper half. Fill them generously, mounding the filling slightly. Ensure all pepper halves are filled evenly. A small spoon works best for this task.
- Top with Cheese: Sprinkle the remaining ½ cup of shredded cheese evenly over the tops of the stuffed pepper halves. This creates that irresistible golden, bubbly crust during baking.
- Bake: Place the baking sheet with the stuffed peppers into the preheated oven. Bake for 20-25 minutes, or until the peppers are tender-crisp (they should still have a slight bite) and the cheese topping is melted, bubbly, and lightly golden brown. Cooking time may vary slightly depending on the size of your peppers and your oven.
- Rest and Garnish: Once baked, carefully remove the baking sheet from the oven. Let the Stuffed Bell Pepper Bites rest for 5-10 minutes before serving. This allows the filling to set slightly and prevents burning mouths! If desired, garnish with freshly chopped parsley just before serving for a pop of color and freshness.
Nutrition
- Serving Size: one normal portion
- Calories: 350
- Fat: 20g
- Carbohydrates: 20g
- Fiber: 5g
- Protein: 25g